
Introduction
Few desserts evoke as much nostalgia and comfort as chocolate chip cookies. Their warm, gooey centers paired with the rich, melted chocolate create a symphony of flavors that tantalizes the taste buds. The allure of chocolate chip cookies lies not only in their taste but also in the memories they conjure—whether it’s the scent wafting through a family kitchen or the joy of baking with loved ones on a rainy afternoon. For many, homemade cookies represent more than just a treat; they symbolize love, tradition, and togetherness.
Homemade cookies have a special place in culinary traditions across the globe. They are often made during family gatherings, holidays, or simply as a way to bring happiness into everyday life. This article serves as your ultimate guide to creating the perfect batch of chocolate chip cookies at home, focusing on the essential ingredients, the science behind baking, and a detailed recipe that ensures success every time.
Whether you’re a novice baker or a seasoned pro, understanding the foundations of cookie making will elevate your baking game. From selecting the finest ingredients to mastering the technique, this guide will equip you with everything you need to know to create cookies that are not only delicious but also memorable.
Understanding the Ingredients
The key to perfecting chocolate chip cookies lies in understanding the role of each ingredient. While the classic version is simple, the nuances of each component can significantly impact the final product. Here’s a closer look at the essential ingredients and their functions.
Flour: Types and Their Roles in Baking
Flour is the backbone of any cookie recipe, providing structure and stability. The most common types of flour used in chocolate chip cookies are all-purpose flour and cake flour.
– All-purpose flour: This versatile flour is the go-to choice for cookies, offering a balanced protein content that yields a chewy texture.
– Cake flour: With a lower protein content, cake flour creates a softer, more tender cookie but can be mixed with all-purpose flour for a balanced texture.
Understanding which flour to use can help you achieve your desired cookie texture, whether you prefer them chewy, crispy, or cake-like.
Sugar: The Impact of Brown Sugar vs. Granulated Sugar
Sugar is crucial not only for sweetness but also for texture and moisture. Chocolate chip cookie recipes typically use a combination of granulated sugar and brown sugar.
– Granulated sugar: This type of sugar contributes to the cookie’s crispness and helps it spread during baking.
– Brown sugar: With its higher moisture content and acidity, brown sugar adds a rich flavor and chewiness to the cookies.
The ratio of these sugars can be adjusted based on your preference—more brown sugar for chewier cookies, or more granulated sugar for a crisper finish.
Butter: Why Using Unsalted Butter Matters
Butter is another pivotal ingredient that enhances flavor and texture in chocolate chip cookies. Using unsalted butter is essential as it allows you to control the salt content in your cookies. The fat in butter not only contributes to a rich flavor but also aids in the cookie’s structure. When creamed with sugar, butter creates tiny air pockets that help the cookies rise and become fluffy.
For the best results, ensure your butter is at room temperature before you begin mixing. This will allow it to cream more efficiently with the sugars, leading to a lighter, airier dough.
Eggs: The Role of Eggs in Texture and Flavor
Eggs play a critical role in binding ingredients together while also providing moisture. They contribute to the cookie’s overall structure and can affect the final texture.
– Whole eggs: Adding a whole egg will provide richness and moisture, leading to a softer cookie.
– Egg yolks: A recipe that calls for extra egg yolks will yield a denser, chewier cookie due to the additional fat.
The temperature of the eggs can also impact the mixing process; room temperature eggs blend more easily into the dough, enhancing the overall consistency.
Chocolate Chips: Choosing the Right Type for Your Cookies
The star of the show in chocolate chip cookies is undoubtedly the chocolate chips. Selecting the right type of chocolate can elevate your cookies from ordinary to extraordinary.
– Semi-sweet chocolate chips: These are the classic choice, offering a balanced sweetness that pairs perfectly with the cookie dough.
– Dark chocolate chips: For those who prefer a richer, less sweet flavor, dark chocolate chips are an excellent alternative.
– Milk chocolate chips: If you’re looking for a sweeter cookie, milk chocolate chips can provide that extra sugary kick.
You can also experiment with other types, such as white chocolate, butterscotch chips, or even chunks of chocolate for varied textures and flavors.
Optional Ingredients and Their Effects
While the classic chocolate chip cookie is beloved in its simplicity, various optional ingredients can add depth and complexity.
– Nuts: Chopped walnuts or pecans can introduce a delightful crunch and additional flavor.
– Oats: Adding rolled oats can create a heartier texture and a slightly chewy cookie.
– Flavor enhancers: A splash of vanilla extract can elevate the flavors significantly, while a sprinkle of sea salt on top can enhance the chocolate taste.
These optional ingredients allow for creativity in your cookie-making process and can cater to different preferences.
The Science Behind Baking Cookies
Baking is as much a science as it is an art. Understanding the science behind the ingredients and process can help you troubleshoot issues and refine your technique.
The Role of Gluten in the Dough
When flour is mixed with liquid, gluten proteins begin to form. This gluten network provides structure and chewiness to your cookies. However, overmixing can lead to excessive gluten development, resulting in tough cookies. Mixing just until combined is key to achieving the perfect texture.
How Baking Soda and Baking Powder Create the Perfect Rise
Baking soda and baking powder are leavening agents that help your cookies rise.
– Baking soda: This alkaline agent requires an acid (like brown sugar or vinegar) to activate. It helps cookies spread out and creates a chewy texture.
– Baking powder: Containing both an acid and a base, baking powder provides an additional rise, creating a lighter cookie.
Using the right balance of these leavening agents is essential for achieving the desired cookie shape and texture.
The Maillard Reaction: Why Browning Matters
The Maillard reaction is a complex chemical reaction that occurs when proteins and sugars are exposed to heat, resulting in browning and the development of rich flavors. This reaction is crucial for cookies, as it enhances both the appearance and taste.
To achieve that perfect golden-brown color, it’s important to bake your cookies at the right temperature and for the right duration, as both underbaking and overbaking can hinder this reaction.
The Importance of Chilling Dough
Chilling the cookie dough is a step that many bakers overlook, yet it can make a significant difference in the final product. When dough is chilled, the fats solidify, resulting in a thicker cookie that holds its shape better during baking. Additionally, chilling allows the flavors to meld and develop, leading to a more delicious cookie.
Step-by-Step Recipe for Classic Chocolate Chip Cookies
Now that we have explored the essential ingredients and the science behind baking, it’s time to dive into the step-by-step recipe for classic chocolate chip cookies. This detailed guide will ensure that you have all the tools and techniques necessary for creating the perfect batch.
Preparation: Required Tools and Equipment
Before you begin baking, gather the following tools and equipment:
– Mixing bowls: A large bowl for mixing wet ingredients and a separate bowl for dry ingredients.
– Measuring cups and spoons: Accurate measurements are crucial for successful baking.
– Electric mixer or whisk: An electric mixer makes creaming butter and sugar easier, but a manual whisk works just as well if you prefer a workout.
– Rubber spatula: For folding in dry ingredients and scraping down the sides of bowls.
– Baking sheets: Ideally, use light-colored baking sheets for even baking.
– Parchment paper: Lining your baking sheets with parchment paper prevents sticking and makes for easier cleanup.
Detailed Instructions for Making the Cookie Dough
1. Preheat your oven: Set your oven to 350°F (175°C) to ensure it’s hot and ready for baking.
2. Cream the butter and sugars: In a large mixing bowl, add 1 cup of unsalted butter (softened to room temperature), 3/4 cup of granulated sugar, and 3/4 cup of packed brown sugar. Using an electric mixer or whisk, cream the mixture together until it’s light and fluffy, about 2-3 minutes.
3. Add the eggs and vanilla: Incorporate 1 large egg and 1 teaspoon of vanilla extract into the creamed butter and sugar mixture. Beat until fully combined.
4. Mix dry ingredients: In a separate bowl, whisk together 2 1/4 cups of all-purpose flour, 1 teaspoon of baking soda, and 1/2 teaspoon of salt. This step helps ensure an even distribution of the leavening agent and salt throughout the dough.
5. Combine wet and dry ingredients: Gradually add the flour mixture to the wet ingredients, mixing just until combined. Be careful not to overmix, as this can lead to tough cookies.
This introduction sets the stage for an in-depth exploration of chocolate chip cookies, highlighting the importance of each ingredient and providing a solid foundation for successful baking. As we move forward, we will delve deeper into the mixing process, baking, and tips for achieving the best results. Stay tuned for the next part of this delicious adventure!
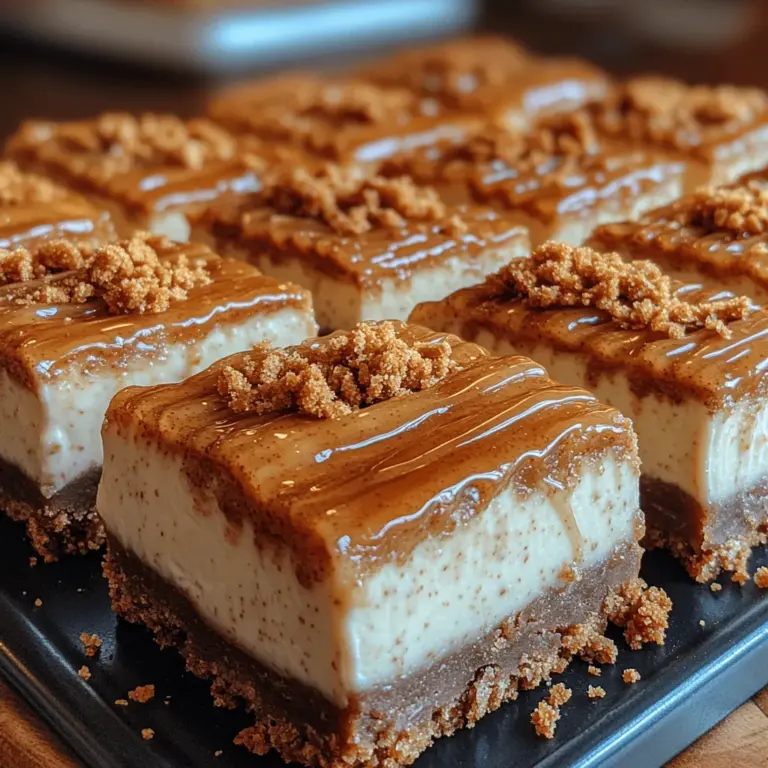
{{image_2}}
Creaming Butter and Sugars
The first step in creating the perfect Decadent Biscoff Cheesecake Bars is creaming together the butter and sugars. Start by taking room temperature butter, approximately 1 cup, and placing it in a large mixing bowl. The butter should be soft enough to blend easily but not melted. Add in ¾ cup of granulated sugar and ¾ cup of packed brown sugar. Using an electric mixer, beat the butter and sugars together on medium speed until the mixture is light and fluffy, typically about 3-5 minutes. This process incorporates air into the butter, which helps your cheesecake bars achieve a light texture.
Adding Eggs and Vanilla
Once your butter and sugars are perfectly creamed, it’s time to add the eggs and vanilla extract. Crack in two large eggs, one at a time, ensuring each egg is fully incorporated before adding the next. This method helps maintain the structure of your batter. Next, add 1 teaspoon of pure vanilla extract to enrich the flavor profile. Continue mixing until everything is well combined. The batter should appear smooth and creamy at this stage, with no visible lumps.
Incorporating Chocolate Chips
To elevate your Biscoff Cheesecake Bars, fold in a generous 1 cup of semi-sweet chocolate chips. You can choose to use mini chocolate chips for a more uniform distribution or regular-sized chips for a bolder chocolate experience. Gently stir the chocolate chips into the batter using a spatula or wooden spoon, being careful not to overmix. The goal is to evenly distribute the chips without breaking them apart. This step adds a delightful contrast to the creamy cheesecake layer and introduces a rich chocolatey flavor.
The Chilling Process and Its Importance
After preparing the batter, it’s crucial to chill it for a little while before baking. Transfer the batter into an airtight container and refrigerate for at least 30 minutes. Chilling helps the flavors meld together and allows the butter to firm up, which leads to a more structured final product. This is especially important for cheesecake bars as it gives them the right texture. While the batter chills, you can prepare the crust to ensure everything is ready for assembly.
Shaping and Baking the Cookies
To assemble your cheesecake bars, first prepare a baking pan (preferably 9×13 inches) by lining it with parchment paper, allowing some overhang. This makes it easier to lift the bars out once they are baked. Spread half of the chilled batter evenly across the bottom of the prepared pan, creating a smooth layer. Next, take your cheesecake mixture (which you should have prepared separately) and spread it evenly over the cookie layer. Finally, dollop the remaining cookie batter on top of the cheesecake layer, spreading it gently with a spatula.
Optimal Baking Temperature and Time
Preheat your oven to 350°F (175°C). Once the oven reaches the desired temperature, place the baking pan inside. Bake your Decadent Biscoff Cheesecake Bars for 30-35 minutes, or until the top is golden brown and a toothpick inserted into the center comes out clean or with a few moist crumbs attached. The edges should be set, while the center may appear slightly soft, as it will firm up as it cools.
How to Know When Cookies Are Done
Knowing when your cheesecake bars are done is crucial for achieving the perfect texture. You’ll want to look for a few key indicators: the edges should be slightly puffed and golden, while the center should have a slight jiggle but not be overly wet. If your toothpick test reveals wet batter, continue baking, checking every few minutes to avoid overbaking. Once done, remove the pan from the oven and allow it to cool completely in the pan. This cooling process is essential for the bars to set properly before slicing.
Variations on the Classic Recipe
While the Decadent Biscoff Cheesecake Bars are delicious as is, experimenting with variations can lead to exciting new flavors. Here are a few ideas:
Gluten-Free Chocolate Chip Cookies
For those with gluten sensitivities, substitute regular flour with a gluten-free blend. Be sure to check that all other ingredients, like chocolate chips and baking powder, are also gluten-free. This way, you can enjoy the same delicious flavors without any gluten-related issues.
Vegan Chocolate Chip Cookie Options
To create a vegan version, replace the butter with a plant-based alternative and use flax eggs (1 tablespoon of ground flaxseed mixed with 2.5 tablespoons of water per egg). Additionally, choose dairy-free chocolate chips. This modification will yield a delightful vegan cheesecake bar that everyone can enjoy.
Unique Flavor Variations
Consider adding unique flavor profiles to your cheesecake bars. A sprinkle of sea salt on top before baking can elevate the sweetness, while a tablespoon of espresso powder mixed into the batter can add a robust flavor. Caramel swirls or even peanut butter can introduce exciting flavors that complement the original recipe beautifully.
The Addition of Various Mix-Ins
Feel free to customize your cheesecake bars by adding nuts like chopped pecans or walnuts for some crunch. Dried fruits such as cranberries or cherries can also provide a delightful contrast to the rich cheesecake. Experimenting with mix-ins allows you to make these bars your own and cater to different tastes.
Storage and Shelf Life
Proper storage is key to maintaining the freshness of your homemade cheesecake bars. Here are some best practices:
Best Practices for Storing Homemade Cookies
Once your bars are completely cooled, slice them into squares and transfer them into an airtight container. You can layer parchment paper between the bars to prevent them from sticking together. Store them at room temperature for up to 5 days, or in the refrigerator for up to a week if you prefer a chilled treat.
How to Freeze Cookie Dough for Future Baking
If you want to prepare for future cravings, consider freezing the cookie dough. Form the dough into balls and place them on a baking sheet lined with parchment paper. Freeze until solid, then transfer the dough balls to a zip-top freezer bag. They can be stored in the freezer for up to three months. When you’re ready to bake, simply add a few extra minutes to the baking time.
Tips for Keeping Cookies Fresh
To keep your cheesecake bars fresh, avoid exposing them to air by sealing them tightly. If you notice any condensation in the container, consider placing a paper towel inside to absorb excess moisture. This will help maintain their chewy texture and prevent them from becoming soggy.
Serving Suggestions
The beauty of Decadent Biscoff Cheesecake Bars lies not only in their flavor but also in their versatility. Here are some creative serving suggestions:
Pairing Cookies with Beverages
These cheesecake bars pair wonderfully with various beverages. A glass of cold milk is a classic choice, but you might also enjoy them with a cup of freshly brewed coffee. The bitterness of the coffee beautifully contrasts with the sweetness of the bars, creating a delightful balance.
Creative Ways to Serve Chocolate Chip Cookies
For a fun twist, consider serving your cheesecake bars with a drizzle of chocolate or caramel sauce on top. A sprinkle of crushed Biscoff cookies can add an extra crunchy texture and enhance the presentation. You could also serve them with a scoop of vanilla ice cream for an indulgent dessert experience.
Incorporating Cookies into Desserts
Get creative by incorporating these bars into other desserts. Crumble them over ice cream sundaes or use them to create ice cream sandwiches by placing a scoop of your favorite ice cream between two bars. The possibilities are endless, and they can elevate any dessert table.
Conclusion
Baking Decadent Biscoff Cheesecake Bars at home is not just about making a delicious treat; it’s about creating a comforting experience that brings joy to your kitchen. The process of mixing, baking, and tasting these bars is a delightful journey that you can share with family and friends. Don’t hesitate to experiment with variations and personal touches to make this recipe uniquely yours. After all, the satisfaction of homemade treats and the smiles they bring are what baking is all about. Embrace the joy of baking and let your creativity shine, knowing that each batch of cheesecake bars will be a delicious testament to your culinary adventures.
