Introduction
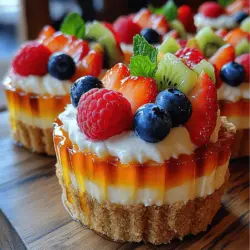
Welcome to the delightful world of Mini Cheesecake Fruit Cups, where the rich, creamy essence of cheesecake meets the vibrant freshness of seasonal fruits. This dessert is not only a feast for the eyes but also a crowd-pleaser, making it an ideal choice for gatherings, celebrations, or even a casual afternoon treat. Imagine a buttery graham cracker crust cradling a luscious cheesecake filling, each cup adorned with an assortment of colorful fruits that make every bite a burst of flavor.
In today’s article, we will take you through the process of creating these delightful mini cheesecakes step-by-step. From understanding the key ingredients that make this dessert a standout to the techniques that ensure each cup is perfectly crafted, you will have all the information you need to impress your family and friends with this delectable treat.
Understanding the Ingredients
To create the perfect Mini Cheesecake Fruit Cups, it’s essential to understand the role each ingredient plays in achieving that rich, smooth, and creamy texture we all love. Let’s explore the primary components that will elevate your cheesecake experience.
The Essence of Cream Cheese
At the heart of any cheesecake lies cream cheese, a crucial ingredient that provides the rich and creamy filling that defines this dessert. Cream cheese not only adds a distinct flavor but also contributes to the velvety texture that makes each bite melt in your mouth.
When selecting cream cheese, there are a few variations to consider. Regular cream cheese is widely available and works perfectly for this recipe, but for a lighter option, consider using reduced-fat cream cheese. It’s important to note that while reduced-fat options can still yield delicious results, they might alter the texture slightly, making it less creamy. If you’re feeling adventurous, try flavored cream cheese varieties, such as strawberry or vanilla, to add a unique twist to your cheesecake filling.
The Sweetness of Sugar
Sugar is another vital ingredient in our Mini Cheesecake Fruit Cups. Granulated sugar not only enhances the sweetness of the cheesecake filling but also helps balance the flavors, counteracting the tanginess of the cream cheese and sour cream.
For those looking to reduce sugar intake or explore healthier alternatives, there are several options available. Natural sweeteners like honey, agave syrup, or maple syrup can be used instead of granulated sugar, although it’s important to adjust the quantity since these alternatives are often sweeter. Additionally, sugar substitutes like stevia or erythritol can provide sweetness without the calories, making them suitable for those on low-calorie diets.
Sour Cream: A Key Player
Sour cream plays a significant role in achieving the signature tangy flavor of our cheesecake filling. It enhances the creaminess while adding a slight acidity that balances the sweetness. When choosing sour cream for this recipe, consider using regular sour cream for its smooth consistency and rich flavor.
Alternatively, if you prefer a thicker texture, opt for Greek yogurt or thick sour cream. Both options will deliver a deliciously creamy result, while also adding a protein boost to your dessert. Keep in mind that the type of sour cream you select can subtly influence the overall taste of your Mini Cheesecake Fruit Cups.
The Role of Heavy Cream
In addition to cream cheese and sour cream, heavy cream is essential for achieving a light and fluffy cheesecake filling. Whipping cream adds air to the mixture, creating a luscious texture that makes the cheesecake feel indulgent yet light on the palate.
When whipping heavy cream, it’s crucial to monitor the consistency. Aim for soft peaks, which means the cream should hold its shape but still have a silky texture. Over-whipping can lead to a grainy texture, so stop as soon as you reach the desired peaks. Incorporating whipped cream into the cheesecake filling will create a delightful contrast to the denser cream cheese base.
Creating the Perfect Crust
A great cheesecake starts with a solid foundation, and for Mini Cheesecake Fruit Cups, that foundation is the crust. The traditional choice for cheesecake crust is graham crackers, but the type you choose can significantly affect the flavor and texture of the final product.
Choosing the Right Graham Crackers
When selecting graham crackers, you’ll find a variety of options available. Look for plain graham crackers that are either sweetened or unsweetened, depending on your personal preference. Unsweetened graham crackers will provide a more balanced flavor, especially when paired with the sweetness of the cheesecake filling and fruits.
If you prefer a little more sweetness, sweetened graham crackers can enhance the overall flavor profile. Additionally, consider using flavored graham crackers, such as cinnamon or chocolate, for an exciting twist on the classic crust.
Preparation Techniques for the Crust
To prepare the crust, start by crushing the graham crackers into fine crumbs. You can achieve this easily using a food processor or by placing the crackers in a resealable plastic bag and rolling over them with a rolling pin. Aim for a texture similar to sand, which will help the crust hold together effectively.
Once crushed, combine the graham cracker crumbs with melted butter and a pinch of sugar to enhance the flavor. The melted butter acts as a binding agent, ensuring that the crumbs stick together when pressed into the cups.
To achieve the ideal crumbly texture, mix the ingredients until they resemble wet sand. Then, pack the mixture tightly into the bottom of each cup, creating an even layer. Use the back of a spoon or your fingers to press down firmly, ensuring the crust is compact.
Baking the Crust
Baking the crust is a crucial step in achieving that perfect golden-brown finish. Preheat your oven to 350°F (175°C) and place the prepared cups in the oven for about 8-10 minutes. Watch closely to prevent burning, as the crust can turn from perfectly golden to overly brown quickly.
Once baked, remove the cups from the oven and allow them to cool completely. This cooling process is essential for ensuring the crust holds its shape when you add the cheesecake filling later on. If the crust is warm, the filling may become too soft, compromising the structure of your Mini Cheesecake Fruit Cups.
Crafting the Cheesecake Filling
Now that you have your crust ready, it’s time to focus on crafting the cheesecake filling. This part of the process is simple but requires some attention to detail to ensure a smooth, creamy texture.
Mixing Techniques for a Smooth Filling
To begin, combine the cream cheese and sugar in a mixing bowl. Use an electric mixer on medium speed to blend the ingredients until smooth and creamy. It’s essential to ensure there are no lumps in the cream cheese, as this will affect the overall texture of the cheesecake.
Once the cream cheese and sugar are well combined, add in the sour cream and heavy cream. Continue mixing until fully incorporated. If you’re using any alternative sweeteners or flavored cream cheese, now is the time to add those as well.
After achieving a smooth consistency, consider folding in some whipped heavy cream to lighten the mixture further. This step is crucial for creating that light and airy texture that makes these Mini Cheesecake Fruit Cups so delightful.
As you mix, be gentle to maintain the airiness of the whipped cream. Use a spatula to carefully fold the whipped cream into the cheesecake mixture until just combined. This technique will help create a filling that is both rich and fluffy, perfect for your dessert cups.
Once your cheesecake filling is ready, you can begin assembling your Mini Cheesecake Fruit Cups, layering the luscious filling over the cooled crust and topping it with your favorite seasonal fruits.
Stay tuned for the next part of our article, where we will guide you through the assembly process and provide tips for decorating and serving these beautiful Mini Cheesecake Fruit Cups to make your dessert truly unforgettable.
{{image_2}}
Mixing Cream Cheese and Sugar for a Smooth Filling
To create the luscious filling for your Mini Cheesecake Fruit Cups, the first step is to mix the cream cheese and sugar to ensure a lump-free texture. Start by taking your cream cheese out of the refrigerator and letting it sit at room temperature for about 30 minutes before you begin. Room temperature ingredients are crucial because they blend more easily, resulting in a creamy, smooth mixture without lumps.
In a large mixing bowl, add the softened cream cheese and granulated sugar. Using an electric mixer on medium speed, beat the mixture for about 2-3 minutes until it is creamy and well-combined. Scrape down the sides of the bowl with a spatula to ensure that all ingredients are thoroughly incorporated. This step is essential for achieving a filling that is both light and smooth, which will hold up beautifully when assembled into cups.
Whipping Heavy Cream: The Secret to Fluffiness
The next crucial step in creating your cheesecake filling is whipping the heavy cream. This step adds a delightful lightness to the filling, giving it that signature cheesecake texture. Start by chilling your mixing bowl and beaters in the refrigerator for about 10-15 minutes before whipping. Cold equipment helps the cream whip faster and achieve better volume.
Pour the heavy cream into the chilled bowl and begin mixing on medium speed. Gradually increase to high speed as the cream starts to thicken. Continue whipping until you reach soft peaks—this means that the cream should hold its shape but still be smooth and not overly stiff. Take care not to over-whip, as this can lead to butter formation, which is not what you want for a cheesecake filling.
Once whipped, you will need to incorporate the heavy cream into the cream cheese mixture. Use a gentle folding technique with a spatula to maintain the airiness of the whipped cream. Start by adding one-third of the whipped cream to the cream cheese mixture and fold until just combined. Repeat with the remaining whipped cream, folding gently until no streaks remain. This step is critical for achieving that desirable fluffy texture in your cheesecake filling.
Assembly of the Mini Cheesecake Cups
Filling the Cups
Now that you have a smooth, creamy filling, it’s time to fill the crusts. Depending on your preference, you can either spoon the filling into the crusts or use a piping bag for a more refined presentation. If you choose to pipe the filling, make sure to use a large round tip to create beautiful swirls.
As you fill each cup, be mindful to leave a little space at the top. This space is essential for adding your fresh fruit toppings and ensures that your dessert remains visually appealing and easy to eat. The filling should be slightly domed above the crusts, creating an inviting look that will entice your guests.
Chilling for the Perfect Set
Once filled, these mini cheesecakes need time to chill. The chilling process is vital as it allows the filling to set properly, enhancing both flavor and texture. Cover the filled cups with plastic wrap and place them in the refrigerator. For best results, chill the cheesecakes for at least 4 hours, but if time allows, overnight chilling is even better. This extended chilling not only improves the firmness of the filling but also allows the flavors to meld beautifully.
Preparing and Topping with Fresh Fruits
Selecting the Best Fruits
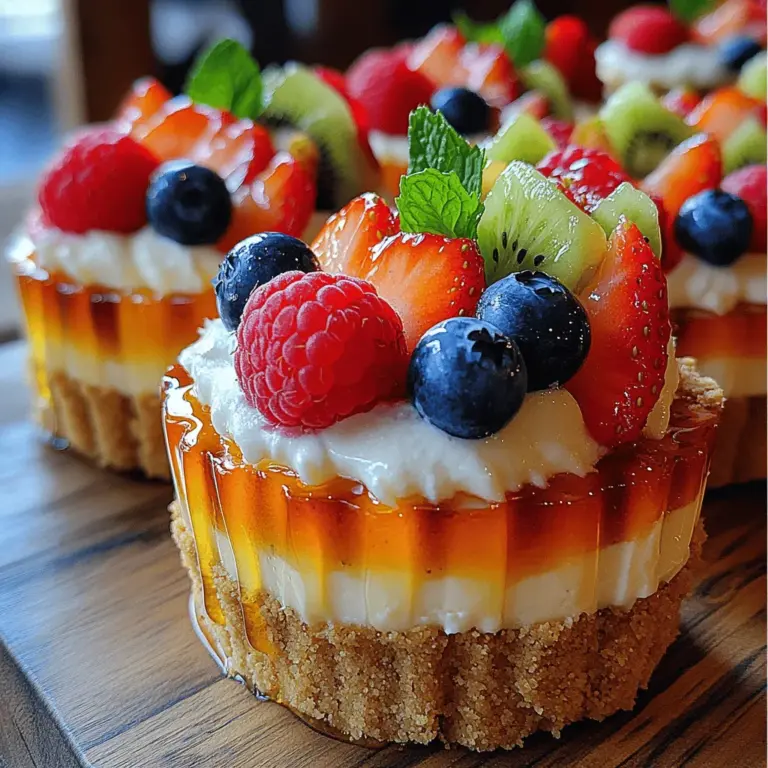
The true beauty of Mini Cheesecake Fruit Cups lies in their colorful, fresh fruit toppings. When selecting fruits, opt for seasonal varieties like strawberries, blueberries, raspberries, and kiwi. Not only do they add a burst of color and flavor, but they also bring nutritional benefits. For example, strawberries are rich in vitamin C, while blueberries are packed with antioxidants, making them a healthy addition to your dessert.
Prepping the Fruits
To prepare the fruits, start by washing them thoroughly under running water to remove any dirt or residues. For strawberries, remove the green tops and slice them into thin pieces. Blueberries and raspberries can be used whole. If you opt for kiwi, peel it and slice it into rounds or half-moons.
When arranging the fruits, consider balancing flavors by mixing sweet fruits with those that are slightly tart. This combination not only enhances the flavor profile of your cheesecake cups but also adds visual interest.
Final Touches: Drizzling and Garnishing
To elevate your Mini Cheesecake Fruit Cups further, consider adding a drizzle of honey or maple syrup over the top for added sweetness. This touch not only enhances the flavor but also adds a beautiful glossy appearance to the fruit. Use a small spoon or a squeeze bottle for precision when drizzling.
For an elegant presentation, garnish each cup with a fresh mint leaf. The bright green color of the mint adds a refreshing contrast to the vibrant fruits and creates a visually stunning dessert that is sure to impress.
Presentation Ideas for Serving
When it comes to serving your Mini Cheesecake Fruit Cups, creativity can turn a simple dessert into a show-stopping centerpiece. Arrange the cups on a decorative platter or tiered stand for a beautiful display. Consider using different heights and angles to add visual intrigue to your table setting.
For an added touch, you can sprinkle some crushed graham crackers around the base of the cups on the platter, echoing the crust and enhancing the overall presentation. Other garnishes, such as edible flowers or a dusting of powdered sugar, can also elevate the visual appeal of your dessert.
Conclusion
Mini Cheesecake Fruit Cups are not just a treat for the taste buds but also a feast for the eyes. With their creamy filling, crunchy crust, and fresh fruit toppings, they make an excellent addition to any gathering or celebration. This recipe is not only simple but also allows for creativity and customization, making it an ideal dessert for both novice and experienced bakers. Whether you’re serving them at a party or enjoying them at home, these delightful cups are sure to bring joy to any occasion. With their appealing presentation and delicious flavors, your Mini Cheesecake Fruit Cups will undoubtedly become a favorite among family and friends. Enjoy crafting this delightful dessert that perfectly captures the essence of summer with every bite!