When it comes to desserts that satisfy both the palate and the conscience, few options are as enticing as vegan chocolate peanut butter fudge. This rich and creamy treat marries the decadent flavors of chocolate and peanut butter, creating a sweet indulgence that is perfect for any occasion. Whether you’re a seasoned vegan or simply someone seeking to reduce your intake of animal products, this fudge is sure to become a favorite in your dessert repertoire.
This recipe is not only a testament to the delightful possibilities of vegan baking but also a celebration of wholesome ingredients that nourish the body. Made with natural sweeteners, nut butters, and coconut oil, this fudge offers a guilt-free way to satisfy your sweet tooth without compromising on flavor or texture. In the following sections, we will delve into the specifics of each ingredient and guide you through the simple steps required to create this delicious treat.
Understanding the Ingredients: A Closer Look at Each Component
The Foundation of Flavor: Natural Peanut Butter
Peanut butter is the star of this recipe, providing both flavor and a creamy texture that is essential for fudge. Beyond its deliciousness, natural peanut butter offers a host of health benefits. It is rich in protein, healthy fats, and essential vitamins, making it a nutritious addition to your diet. When selecting peanut butter for this fudge, you have the option of smooth or crunchy varieties. Smooth peanut butter creates a velvety fudge, while crunchy peanut butter adds delightful texture with little bits of peanuts throughout.
Sweetening the Deal: Maple Syrup vs. Agave Nectar
Sweetness is a crucial element in any dessert, and for this fudge, you can choose between maple syrup and agave nectar. Both are natural sweeteners, but they come with different flavor profiles and health benefits. Maple syrup has a distinct, rich flavor that pairs beautifully with the chocolate and peanut butter, while agave nectar is milder and sweeter, making it a great alternative for those who prefer a subtler taste. When incorporating these sweeteners into your fudge, consider how each will complement the overall flavor and whether you’re looking for a more pronounced sweetness or a gentle lift.
The Role of Coconut Oil in Vegan Fudge
Coconut oil serves a dual purpose in this recipe: it not only adds richness to the fudge but also helps to set it as it cools. This oil is known for its numerous health benefits, including its ability to support heart health and boost metabolism. When used in baking, coconut oil can provide a subtle coconut flavor, which enhances the overall taste of the fudge. If you’re looking for alternatives, you can substitute coconut oil with other oils such as almond oil or vegetable oil; however, be mindful that this may alter the flavor and texture of your final product.
Cocoa Powder: The Heart of Chocolate Flavor
No chocolate fudge would be complete without cocoa powder, which brings the essential chocolatey goodness to this recipe. When choosing cocoa powder, you’ll find options like Dutch-processed and natural cocoa. Dutch-processed cocoa has a milder flavor and darker color, while natural cocoa is more acidic and has a stronger chocolate flavor. Both types offer unique nutritional benefits, such as antioxidants and dietary fiber, contributing to the overall healthfulness of your fudge.
The Importance of Powdered Sugar for Texture
Powdered sugar is key in achieving the smooth texture characteristic of fudge. It dissolves easily and helps bind the ingredients together, creating a luscious mouthfeel. To ensure a lump-free fudge, it’s important to sift the powdered sugar before incorporating it into your mixture. If you’re looking for alternatives, coconut sugar or homemade powdered sugar can be used, but these may yield a slightly different texture and sweetness level.
Adding Depth: Vanilla Extract and Sea Salt
To elevate the flavors in your fudge, a splash of vanilla extract is a must. Vanilla enhances the sweetness and brings a depth of flavor that makes every bite more enjoyable. Pairing this with a pinch of sea salt can provide a perfect balance, cutting through the sweetness and enhancing the chocolate and peanut butter flavors. The combination of sweet and salty is a classic in dessert-making, and it is particularly effective in fudge recipes.
Optional Additions: Chopped Peanuts and Vegan Chocolate Chips
For those who enjoy a bit of crunch or extra chocolatey goodness, consider adding chopped peanuts or vegan chocolate chips to the mixture. These optional ingredients not only enhance the flavor profile but also add visual appeal to your fudge. Chopped peanuts provide a delightful texture contrast, while vegan chocolate chips can amplify the chocolate flavor, making your fudge even more decadent.
Step-by-Step Instructions: Making Your Vegan Chocolate Peanut Butter Fudge
Now that we’ve explored the ingredients that make this fudge so special, it’s time to get down to the nitty-gritty of making it. Follow these step-by-step instructions to ensure your vegan chocolate peanut butter fudge turns out perfectly every time.
Preparing Your Baking Dish for Success
The first step in creating your fudge is to prepare your baking dish. A square or rectangular dish works best, typically 8×8 or 9×9 inches in size. To prevent sticking and make removal easier, line the bottom and sides of the dish with parchment paper. This is essential as it not only ensures easy release but also helps maintain the fudge’s shape once it has set. Make sure to leave some overhang on the sides; this will serve as handles when you’re ready to lift the fudge out of the dish.
Mixing the Wet Ingredients: Achieving the Perfect Consistency
In a mixing bowl, combine the peanut butter, coconut oil, and your choice of sweetener (maple syrup or agave nectar). Using a whisk or a hand mixer, blend the ingredients together until they are smooth and well incorporated. It’s important to achieve a consistent texture here, as this will be the foundation for your fudge. If you find that the mixture is too thick, you can gently heat it in the microwave for a few seconds to help it combine more easily.
Incorporating Dry Ingredients: The Science of Fudge
Once your wet ingredients are well mixed, it’s time to incorporate the dry ingredients. Sift in the cocoa powder and powdered sugar, and fold them into the wet mixture. Take care to mix gently, as overmixing can lead to a dense fudge. You want to achieve a thick batter that holds its shape but is still spreadable. If you’re adding vanilla extract and sea salt, now is the time to mix those in as well.
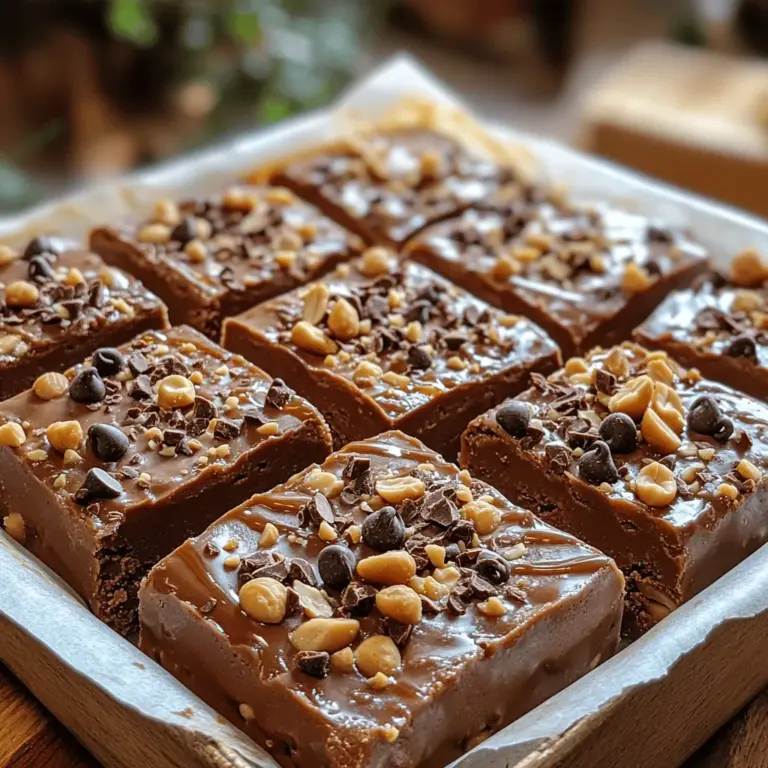
With these initial steps, you’re well on your way to creating a delicious batch of vegan chocolate peanut butter fudge that is sure to impress. Stay tuned for the next part of this article, where we’ll delve deeper into the remaining steps and tips for achieving the perfect fudge consistency and flavor. Whether you’re serving it at a gathering or enjoying it as a treat for yourself, this fudge is bound to be a hit.
{{image_2}}
How to Avoid Lumps and Achieve a Smooth Mixture
Achieving a smooth mixture is crucial for the perfect vegan chocolate peanut butter fudge. To avoid lumps, start by ensuring that all of your ingredients are at room temperature. Cold ingredients can cause fats to solidify prematurely, leading to a bumpy texture.
When mixing your ingredients, use a high-speed blender or a food processor. These appliances are equipped to thoroughly blend the ingredients, ensuring a silky consistency. If you notice any lumps while mixing, stop the blender and scrape down the sides to incorporate everything evenly.
The Role of Sifting in Baking
Sifting plays a vital role in baking, especially when working with dry ingredients like cocoa powder or powdered sugar. Sifting aerates these ingredients, breaking up clumps and allowing for a more even mix. This step is particularly important in our fudge recipe, as it helps prevent a gritty texture in your final product.
To sift effectively, use a fine-mesh sieve or a sifter. Simply add the dry ingredients into the sieve and shake it back and forth over your mixing bowl. This process not only helps to eliminate lumps but also ensures that your dry ingredients are evenly distributed when combined with wet ingredients.
Transferring the Mixture: Ensuring Even Distribution
Once your fudge mixture is smooth and lump-free, it’s time to transfer it into your prepared pan. This step requires careful attention to ensure even distribution, which contributes to a consistent texture throughout your fudge.
Techniques for Smoothing the Fudge Mixture
To transfer the mixture, use a spatula to scrape it from the mixing bowl into your lined pan. Start from one corner of the pan and work your way to the opposite side, spreading the mixture as you go. This technique minimizes air bubbles and helps in achieving an even layer.
If the mixture is particularly thick, dipping your spatula in warm water can help it glide smoothly across the surface. Once the fudge is in the pan, use the back of the spatula to press down firmly, ensuring that there are no air pockets.
Tips for Creating a Polished Top Surface
To create a polished and professional-looking top, take an offset spatula or a straight-edged tool, and gently smooth the surface. You can also lightly tap the pan on the counter a few times; this action helps to settle the mixture and eliminate any remaining air bubbles.
For an added touch of elegance, consider creating a marbled effect. Before completely smoothing out the top, swirl a spoonful of additional melted peanut butter or chocolate through the mixture to create an artistic pattern.
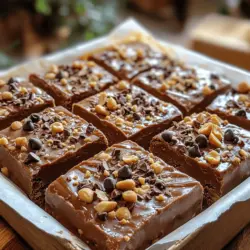
Topping Your Fudge: Personalizing Your Creation
Toppings can elevate your fudge from simple to spectacular. While chopped peanuts and chocolate chips are classic choices, feel free to get creative and explore different toppings that can enhance both flavor and texture.
Creative Ideas for Toppings Beyond Peanuts and Chocolate Chips
Some delightful topping ideas include:
– Coconut Flakes: Toasted coconut adds a sweet, nutty flavor and a crispy texture.
– Sea Salt: A sprinkle of flaky sea salt can enhance sweetness and provide a gourmet touch.
– Chopped Nuts: Pecans, walnuts, or almonds offer a delightful crunch and complement the fudge’s creaminess.
– Dried Fruit: Chopped dates, cranberries, or cherries can add a chewy texture and a burst of fruity flavor.
– Vegan Caramel Drizzle: Drizzling vegan caramel sauce on top can add richness and an irresistible sweetness.
How Toppings Enhance the Visual Appeal and Texture
In addition to boosting the flavor profile, toppings add an attractive visual element to your fudge. A colorful mix of toppings not only makes your fudge more appealing but also hints at the different flavors awaiting your guests. The contrasting textures—from the creamy fudge base to the crunchy or chewy toppings—create an enjoyable eating experience.
Chilling the Fudge: Setting for Perfection
Once you have added your toppings, it’s time to let your fudge set. The chilling process is essential for achieving the correct texture, allowing the fudge to firm up and develop its characteristic bite.
Understanding the Chilling Process
Place your pan in the refrigerator to chill. The cold environment helps solidify the fats in the peanut butter and coconut oil, resulting in a rich, creamy texture.
How Long to Chill Based on Desired Texture
For a softer, creamier fudge, chill for about 2 hours. If you prefer a firmer texture, allow it to chill for at least 4 hours or overnight. Keep in mind that the longer you chill, the denser your fudge will become.
Cutting and Serving: Making Beautiful Portions
Once your fudge has set, it’s time to cut it into beautiful portions. Proper cutting techniques can make a big difference in presentation.
Techniques for Cutting Clean Squares
To cut your fudge cleanly, use a sharp knife that has been warmed under hot water—this technique prevents the fudge from sticking to the blade. Wipe the knife with a paper towel between cuts to maintain clean edges. For a uniform size, consider using a ruler to measure and mark the cuts before slicing.
Presentation Ideas to Impress Guests
To create an impressive presentation, arrange the fudge squares on a decorative platter. You can place them in neat rows or stack them for a more casual look. Adding a few garnishes, such as fresh mint leaves or additional toppings scattered around the fudge, can enhance the visual appeal.
Storing Leftovers: Keeping Your Fudge Fresh
If you have any leftovers (though that’s unlikely), you’ll want to store them properly to maintain their freshness and flavor.
Best Practices for Refrigeration and Freezing
To store your fudge, place it in an airtight container lined with parchment paper. This helps to prevent sticking. For refrigeration, make sure to keep it in the fridge, where it can last for up to two weeks. If you want to store it for longer, you can freeze the fudge. Wrap it tightly in plastic wrap and then place it in a freezer-safe container. Frozen fudge can last for up to three months.
How to Maintain Flavor and Texture Over Time
To ensure your fudge retains its original flavor and texture, avoid exposing it to moisture or strong odors in the refrigerator. When you’re ready to enjoy the frozen fudge, simply remove it from the freezer and let it thaw at room temperature for about 30 minutes before serving. This will help restore its creamy texture.
Presentation Tips: Elevating Your Fudge Experience
Presentation plays a significant role in how desserts are perceived. By taking the time to arrange and garnish your fudge thoughtfully, you can create an experience that delights the eyes as well as the palate.
Creative Plating Ideas for Serving
Consider using small dessert plates for individual servings, or create a dessert board with an assortment of treats, including your fudge. Pair it with fresh fruit, vegan whipped cream, or a scoop of vegan ice cream for a delightful dessert platter.
Using Garnishes to Enhance the Dessert
Garnishes can elevate your fudge from ordinary to extraordinary. A drizzle of melted dark chocolate creates an enticing visual while adding a rich flavor. Additionally, consider incorporating fresh berries or edible flowers for a pop of color that complements your fudge.
Garnishing Options: Adding a Touch of Elegance
Garnishing your fudge not only enhances its visual appeal but also provides an opportunity to add extra flavor nuances.
Exploring the Use of Melted Chocolate and Additional Toppings
Melted chocolate can be drizzled over the top of your fudge for an elegant finishing touch. You can also sprinkle additional toppings like crushed nuts or colorful sprinkles right after drizzling to create an eye-catching effect.
Seasonal Presentation Ideas for Different Occasions
For festive occasions, consider using seasonal toppings or garnishes. For instance, during the holidays, crushed peppermint candies can add a refreshing twist, while autumn presents an opportunity to use pumpkin spice or cinnamon sugar for a seasonal flair.
Nutritional Analysis: Understanding the Benefits of Your Fudge
By choosing wholesome ingredients, your vegan chocolate peanut butter fudge not only satisfies your sweet tooth but also provides nutritional benefits.
Breaking Down the Nutritional Value
Each ingredient contributes to the overall nutritional profile of the fudge:
– Peanut Butter: Rich in protein and healthy fats, peanut butter provides energy and aids in muscle recovery.
– Cocoa Powder: Packed with antioxidants, cocoa powder can enhance heart health and improve mood.
– Maple Syrup: A natural sweetener, maple syrup contains minerals like zinc and manganese and has a lower glycemic index than refined sugars.
Health Benefits of Each Ingredient
In moderation, consuming these ingredients as part of a balanced diet can provide various health benefits. The healthy fats from peanut butter can support brain health, while cocoa powder’s antioxidants can reduce inflammation and promote overall wellness.
Balancing Indulgence with Nutrition
While it’s easy to indulge in sweet treats, it’s essential to enjoy them mindfully. Pairing your fudge with healthier options, such as fresh fruit or a handful of nuts, can create a more balanced snack.
How to Enjoy Treats Mindfully
Practice mindful eating by savoring each bite of your fudge. Take the time to appreciate the flavors and textures, allowing yourself to truly enjoy the experience. This approach can enhance satisfaction and help prevent overindulgence.
Suggestions for Pairing with Healthier Options
Consider serving your fudge alongside a fresh fruit salad or a smoothie bowl. These options not only provide additional nutrients but also create a well-rounded dessert experience.
Conclusion: Savoring Every Bite of Your Vegan Chocolate Peanut Butter Fudge
In summary, this Decadent Vegan Chocolate Peanut Butter Fudge recipe not only satisfies cravings but also embraces wholesome ingredients that contribute to a balanced diet. With its straightforward preparation and delightful flavors, it stands as a testament to the fact that vegan desserts can be just as indulgent and satisfying as their traditional counterparts.
Enjoy your homemade fudge as a special treat, a gift for loved ones, or a delightful addition to any gathering—each bite is a celebration of flavor and compassion. Whether enjoyed solo or shared with friends, this fudge is sure to leave a lasting impression.