Crispy Onion Rings: Air-Fried Perfection
Introduction
Onion rings are a beloved snack and side dish, enjoying immense popularity across various cuisines. Their irresistible crunch, savory flavor, and satisfying texture make them a favorite at restaurants, fairs, and home kitchens alike. Traditionally deep-fried and often loaded with calories, onion rings have a reputation for being an indulgent treat. However, with the rise of healthier cooking methods, air frying has emerged as an innovative alternative, allowing food enthusiasts to enjoy crispy onion rings without the guilt associated with traditional frying.
Air frying is revolutionizing the way we approach our favorite fried foods. By circulating hot air around the food, air fryers achieve that coveted crispy exterior while significantly reducing the amount of oil needed. This method not only retains the flavor and texture we love but also provides a healthier option for those conscious of their diet. Our goal with this recipe is to create irresistibly crispy, flavorful onion rings using simple ingredients and straightforward steps that anyone can follow.
Understanding Onion Rings
Onion rings are essentially slices of onion that are battered and fried until golden brown, resulting in a crunchy exterior and sweet, tender interior. They are a staple in American fast food but can also be found in various forms across different cultures. For instance, in the United Kingdom, onion rings are often served as a side dish with fish and chips, while in some parts of Asia, they are incorporated into tempura dishes, showcasing their versatility and global appeal.
The history of onion rings dates back to the 19th century, with various recipes appearing in cookbooks throughout the years. The concept of frying vegetables has been around for centuries, but onion rings gained prominence in the U.S. during the mid-20th century, becoming a staple of diner menus and fast-food restaurants. As the culinary landscape evolved, so did the methods of preparing onion rings, leading to the introduction of air frying as a healthier alternative that maintains the classic crunch and flavor.
The Benefits of Air Frying
Air frying works by using a powerful fan to circulate hot air around the food, creating a crispy exterior without the need for excessive oil. This method not only cuts down on calories and fat content but also allows for a quicker cooking time compared to traditional frying. The result is a dish that feels indulgent yet aligns better with health-conscious eating habits.
One of the primary nutritional benefits of air frying is the significant reduction in fat. While traditional frying can involve soaking food in oil, air frying typically requires just a light coating, leading to dishes that are lower in calories and saturated fats. Furthermore, the air frying process helps retain essential nutrients in the food, ensuring you enjoy both the taste and health benefits.
Convenience is another advantage of air frying. The cooking process is generally faster, and the clean-up is far more manageable than dealing with pots of hot oil. This method allows home cooks to whip up delicious, crispy onion rings in no time, making it an appealing option for busy weeknights or spontaneous gatherings.
Essential Ingredients for Crispy Onion Rings
Creating the perfect crispy onion rings requires a few essential ingredients, each playing a crucial role in achieving that ideal flavor and texture:
– Sweet Onions (Vidalia): Sweet onions, such as Vidalia or Walla Walla, are preferred for this recipe due to their natural sweetness and mild flavor. Their tenderness makes them ideal for frying, ensuring a delightful bite that balances well with the crunchy coating.
– All-Purpose Flour: This forms the first layer of coating, helping the buttermilk adhere to the onions and providing a base for the subsequent layers.
– Spices (Smoked Paprika, Garlic Powder, Onion Powder): Enhancing the flavor profile of the onion rings, these spices add depth and complexity, making each bite deliciously memorable.
– Buttermilk: Essential for moisture, buttermilk not only helps the coating stick but also tenderizes the onions, resulting in a soft interior that contrasts beautifully with the crunchy exterior.
– Panko Breadcrumbs: Known for their light and airy texture, panko breadcrumbs create that signature crunch that every onion ring should have. They provide a crispiness that regular breadcrumbs often lack.
– Optional Ingredients: For those who enjoy a bit of heat, cayenne pepper can be added to the spice mix to give the onion rings an extra kick.
Step-by-Step Guide to Making Air-Fried Onion Rings
Preparing the Onions
To begin making your crispy air-fried onion rings, the first step is to prepare the onions. Start by selecting high-quality sweet onions, as their flavor will significantly impact the final product. Once you have your onions, follow these steps:
1. Peel and Slice: Carefully peel the outer layers of the onions and slice them into even rings, about half an inch thick. Aim for uniformity in size to ensure even cooking.
2. Separate the Rings: Gently separate the onion rings from each other, taking care not to break them. This will help them cook evenly and maintain their shape during the air-frying process.
3. Soak in Buttermilk: Place the separated onion rings into a bowl of buttermilk, making sure they are fully submerged. Let them soak for at least 30 minutes. This soaking process is crucial as it not only adds flavor but also helps to tenderize the onions, ensuring a melt-in-your-mouth experience.
As you prepare your onions, you can also gather the remaining ingredients and set up your cooking station. Having everything ready will streamline the process and make it easier to follow the recipe as you move forward to the next steps.
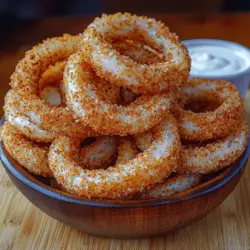
Stay tuned for the continuation of this delicious journey into making the perfect air-fried onion rings, where we will cover the crucial coating process and the air frying technique that brings these rings to life.
{{image_2}}
Detailed Instructions on How to Slice and Separate Onion Rings
To create perfectly crispy onion rings, the first step is to prepare your onions. Start by selecting large, firm onions, preferably yellow or sweet varieties, as they offer the best flavor and texture. Here’s how to slice and separate them into rings:
1. Peel the Onion: Remove the outer skin from the onion and discard it. Trim both ends of the onion to create a flat surface, which will help stabilize it during slicing.
2. Slice the Onion: Place the onion flat on the cutting board. Using a sharp knife, slice the onion into 1/4 to 1/2-inch thick rounds. The thickness you choose will impact the final texture of your onion rings—thicker rings can be juicier, while thinner ones might get crispier.
3. Separate the Rings: Carefully separate the onion slices into rings. Try to keep the rings intact without breaking them. You can use the smaller inner rings in other dishes or save them for a different recipe.
Tips for Achieving Uniform Ring Size for Even Cooking
Uniformity is key when it comes to cooking onion rings evenly. Here are some tips to ensure that all your rings are similar in size:
– Use a Mandoline Slicer: For consistent thickness, consider using a mandoline slicer. This tool allows you to control the thickness precisely and reduces the risk of uneven cuts.
– Mark Your Cutting Guide: If you are using a knife, lightly draw guidelines on the onion’s surface with a marker to help you maintain even thickness as you slice.
– Practice Patience: It may take a bit longer to achieve uniform rings, but the effort is worth it when you bite into perfectly cooked onion rings.
Setting Up the Breading Stations
Once your onion rings are sliced and separated, it’s time to set up your breading stations, which is crucial for achieving that perfect crunch.
Explanation of the Dry and Wet Breading Stations
You will need two separate stations: one for the dry ingredients and one for the wet.
– Dry Station: Combine all your dry ingredients in a shallow bowl. This typically includes flour, breadcrumbs, and seasonings. A common mixture involves all-purpose flour, seasoned breadcrumbs, and a pinch of salt and pepper.
– Wet Station: In another shallow bowl, whisk together eggs and a splash of milk or buttermilk. The egg mixture acts as a glue, helping the dry coating adhere to the onion rings.
Importance of Proper Coating Techniques to Ensure Adherence and Flavor
The coating process is vital for flavor and texture. Here’s how to ensure that your onion rings are coated properly:
1. Start with Dry Ingredients: Dredge each onion ring in the flour mixture first. This dry layer helps the egg wash stick better.
2. Dip in the Wet Mixture: Next, dip the floured onion rings into the egg mixture, ensuring they are fully coated.
3. Final Dry Coating: Return the onion rings to the dry mixture, pressing gently to adhere the breadcrumbs. This double-coating method creates a thicker crust that is both crunchy and flavorful.
Coating Process
The coating process can be a bit messy, but with some care, you can minimize the mess and maximize coverage:
1. Use One Hand for Wet and One for Dry: To prevent clumping, designate one hand for the wet ingredients and the other for the dry. This technique helps keep your fingers clean and reduces the amount of flour and breadcrumbs that stick to your hands.
2. Work in Batches: Coat the onion rings in small batches, allowing you to focus on ensuring each ring is evenly covered without feeling rushed.
3. Shake Off Excess: After coating, gently shake off any excess breadcrumbs before placing the rings in the air fryer basket. This step is essential for achieving that extra crunch.
Air Frying the Onion Rings
Now that your onion rings are breaded, it’s time to cook them to crispy perfection in the air fryer.
Detailed Instructions on Preheating the Air Fryer and Preparing the Basket
1. Preheat Your Air Fryer: Set your air fryer to 375°F (190°C) and let it preheat for about 5 minutes. Preheating ensures that your onion rings start cooking immediately, resulting in a better texture.
2. Prepare the Air Fryer Basket: Lightly spray the air fryer basket with cooking spray or line it with parchment paper. This will prevent the onion rings from sticking and make cleanup easier.
Importance of Spacing the Rings and the Effects on Crispiness
When placing the onion rings in the air fryer, spacing is crucial for achieving that desired crispiness:
– Single Layer Cooking: Arrange the onion rings in a single layer, avoiding any overlap. This allows hot air to circulate evenly around each ring, promoting crispiness.
– Batch Cooking: If you have a large batch of onion rings, consider cooking them in batches to ensure even cooking and to maintain optimal air circulation.
Timing and Flipping Instructions for Perfect Results
1. Cooking Time: Air fry the onion rings for about 10-12 minutes, flipping them halfway through. This ensures both sides are evenly cooked and crispy.
2. Check for Doneness: The onion rings should be golden brown and crispy. If they require more time, continue cooking in 2-minute increments, keeping an eye on them to prevent burning.
Serving Suggestions for Onion Rings
Crispy onion rings are a fantastic snack or side dish, and there are countless ways to serve them:
Ideas for Pairing Onion Rings with Various Dipping Sauces
– Creamy Ranch: A classic pairing, creamy ranch dressing complements the onion rings’ crunch with its cool, tangy flavor.
– Tangy Marinara: For a twist, serve your onion rings with marinara sauce. The acidity cuts through the richness, making it a delightful combination.
– Zesty Aioli: Elevate your onion rings with a homemade aioli. Simply mix mayonnaise with garlic, lemon juice, and a touch of Dijon mustard for a zesty dip.
Presentation Tips to Elevate the Dish for Gatherings or Casual Meals
– Serve on a Platter: Arrange the onion rings in a tower on a large platter for an eye-catching presentation.
– Garnish with Fresh Herbs: Sprinkle chopped parsley or chives on top to add color and freshness.
Suggestions for Complementary Dishes to Serve Alongside Onion Rings
Onion rings pair well with various dishes, including:
– Burgers: Serve them alongside your favorite burger for a classic diner-style meal.
– Salads: A crisp salad can balance the richness of the onion rings.
– Sandwiches: Include onion rings as a side for sandwiches, adding an extra crunch.
Nutritional Information
Understanding the nutritional content of your homemade onion rings can help you enjoy them as part of a balanced diet:
– Nutritional Breakdown (per serving, approximately 4 onion rings):
– Calories: 150
– Total Fat: 6g
– Saturated Fat: 1g
– Cholesterol: 30mg
– Sodium: 200mg
– Carbohydrates: 20g
– Dietary Fiber: 1g
– Sugars: 1g
– Protein: 3g
Discussion on Portion Control and Enjoying Indulgent Snacks as Part of a Balanced Diet
While onion rings can be indulgent, practicing portion control is key. Enjoying a small serving alongside a balanced meal allows you to satisfy cravings without overindulging. Pairing them with fresh vegetables or lean proteins can enhance your overall meal quality.
Conclusion
Making crispy onion rings at home using an air fryer is a rewarding experience that elevates your cooking skills and brings joy to your dining table. The combination of a crunchy exterior and tender onion inside makes for a delightful snack or side dish that everyone loves.
Don’t hesitate to experiment with different dipping sauces and variations of the recipe, such as adding spices to the breading or trying out different types of onions. The pleasure of sharing homemade snacks with friends and family enhances the dining experience, creating memorable moments.
So, gather your ingredients, follow these steps, and enjoy the satisfaction of serving up a batch of crispy, air-fried onion rings that are sure to impress!