
In recent years, pickle snacks have surged in popularity, captivating snack lovers with their tangy flavor and satisfying crunch. From classic dill pickles to pickle-flavored chips and even popcorn, the allure of pickles has transcended traditional snacking boundaries. Among the innovative ways to enjoy this beloved brined vegetable, the recipe for Crunchy Dill Delight: Crispy Baked Pickle Chips stands out as a healthier alternative to the traditional frying method. This recipe not only delivers a satisfying crunch but also offers a unique flavor profile that is both refreshing and addictive, making it a must-try for anyone looking to elevate their snacking experience.
Understanding the Appeal of Baked Pickle Chips
The growing trend toward healthier eating has led to an increased interest in baked snacks, as consumers seek options that are lower in calories and fat without sacrificing taste. Baked pickle chips fit perfectly into this category, combining the beloved flavor of dill pickles with a crispy texture that is hard to resist. Unlike their fried counterparts, which can be greasy and heavy, baked pickle chips provide a lighter alternative that still delivers a satisfying crunch.
The flavor profile of dill pickles is another reason for their widespread appeal. The distinct taste of dill, combined with the acidity of vinegar and the crunch of the cucumber, creates a delightful experience for the palate. Dill pickles are incredibly versatile, complementing a wide range of cuisines and serving as a perfect accompaniment to sandwiches, burgers, or simply enjoyed as a snack. The combination of tartness and savory notes makes these crispy baked pickle chips an exciting option for any snack lover.
What truly sets baked pickle chips apart is their contrasting texture. The crispy exterior of the chips juxtaposes the juicy, tangy pickle inside, creating a delightful bite that keeps you coming back for more. This textural contrast, combined with the bold flavors of dill and spices, makes Crunchy Dill Delight an irresistible snack that can easily become a staple in your kitchen.
Ingredients Breakdown
To create the perfect batch of Crunchy Dill Delight: Crispy Baked Pickle Chips, you’ll need a handful of simple ingredients that come together to create a delightful snack. Each ingredient plays a crucial role in achieving that perfect crunch and flavor.
Dill Pickle Slices
The star of this recipe is undoubtedly the dill pickle slices. When choosing your pickles, you can opt for traditional dill pickles or explore variations such as spicy dill or bread-and-butter pickles for a sweeter twist. Slices are preferred for this recipe due to their ideal size for snacking, but if you prefer spears, feel free to modify the cooking time accordingly, as they may need a bit longer to bake.
All-Purpose Flour
All-purpose flour serves as the first layer in the breading process. It helps create a base that allows the egg wash to adhere to the pickles, ensuring that the breadcrumbs stick well during baking. For those looking for gluten-free alternatives, almond flour or a gluten-free all-purpose blend can be used without compromising the final result.
Eggs
Eggs act as a binding agent in this recipe, providing the necessary moisture for the breadcrumbs to adhere to the pickles. The egg wash creates a cohesive coating that enhances the crunch of the baked chips. If you’re looking for a vegan alternative, aquafaba (the liquid from canned chickpeas) can serve as an effective substitute.
Breadcrumbs
To achieve that sought-after crunch, using panko breadcrumbs is essential. Panko is coarser than traditional breadcrumbs, which contributes to a lighter and crispier texture when baked. If panko is not available, regular breadcrumbs can be used, but be mindful that they may yield a slightly denser chip.
Seasonings
The flavor enhancement in these baked pickle chips comes from a blend of seasonings that elevate their taste:
– Garlic Powder and Onion Powder: Both of these seasonings add depth and savory notes, enhancing the overall flavor of the chips.
– Smoked Paprika: A touch of smoked paprika introduces a subtle smoky twist, giving the chips an added layer of complexity.
– Black Pepper and Salt: These basic seasonings balance the flavors and enhance the natural taste of the dill pickles.
For those with dietary preferences or restrictions, feel free to experiment with the seasonings. For instance, adding cayenne pepper can introduce heat, while using nutritional yeast can impart a cheesy flavor for a vegan twist.
Step-by-Step Instructions
Before diving into the recipe, it’s important to set the stage for success. Here are the initial steps to prepare for making your Crunchy Dill Delight: Crispy Baked Pickle Chips.
Preheating the Oven and Preparing the Baking Sheet
Start by preheating your oven to 425°F (220°C). A hot oven is crucial for achieving the desired crispiness. While the oven is warming up, line a baking sheet with parchment paper to prevent the chips from sticking and to make cleanup easier.
Preparing the Pickles
Once your oven is preheated, it’s time to prepare the pickles. Begin by removing the dill pickle slices from their jar. Pat them dry with paper towels to remove excess moisture. This step is essential, as it helps the breading adhere better and ensures that the chips become crispy during baking. If using spears, make sure they are evenly sliced to ensure consistent cooking.
With the pickles ready and the oven preheated, you’re now set to proceed with the breading process. The next steps will guide you through creating the perfect crunchy coating for your baked pickle chips, leading you one step closer to enjoying this delightful snack. Stay tuned as we delve into the detailed instructions that will transform simple dill pickles into a crunchy, flavorful treat that is sure to please!
{{image_2}}
Techniques for Drying Pickle Slices to Ensure Crispiness
To achieve the ultimate crunchiness in your baked pickle chips, proper drying techniques are crucial. Excess moisture can lead to soggy chips that fail to deliver a satisfying crunch. Here are effective methods to ensure your pickle slices are perfectly dried:
1. Paper Towel Method: After slicing the pickles, lay them out in a single layer on a few layers of paper towels. Pat them dry gently with additional paper towels. This method absorbs surface moisture effectively.
2. Air Drying: If you have time, allow the sliced pickles to air dry on a wire rack for about 30 minutes. This increases airflow around the slices, promoting moisture evaporation.
3. Salting: Sprinkle the pickle slices lightly with salt before drying. Let them sit for about 10-15 minutes, then rinse and dry with paper towels. The salt draws out moisture, enhancing the crispiness of your chips.
Setting Up the Breading Station
A well-organized breading station streamlines the process and ensures that your pickles are evenly coated. Here’s how to set it up:
1. Prepare Your Ingredients: Gather all necessary ingredients: flour, eggs, and breadcrumbs (panko is recommended for extra crunch).
2. Create an Assembly Line:
– First Station: Place a shallow dish with flour seasoned with salt and pepper.
– Second Station: Set up a bowl with beaten eggs (you can also add a splash of water or milk for extra moisture).
– Third Station: Fill another shallow dish with seasoned breadcrumbs. Consider adding spices like garlic powder, onion powder, or cayenne pepper for an added kick.
3. Organize Your Workspace: Keep a clean and tidy area to prevent cross-contamination and maintain efficiency. Designate space for placing breaded pickles before they go onto the baking sheet.
Explanation of the Three-Step Breading Process
The three-step breading process is essential for achieving that crispy crust:
1. Dredging in Flour: Start by coating each pickle slice lightly in flour. This initial layer helps the egg stick better, ensuring a thorough coating.
2. Dipping in Egg: After flour, dip the slice into the beaten egg mixture. This step binds the breadcrumbs to the pickle, creating a crispy layer.
3. Coating with Breadcrumbs: Finally, roll the pickle slice in the breadcrumb mixture, pressing gently to ensure an even coating. This final layer is what contributes to the delightful crunch.
Tips for Maintaining an Organized and Efficient Workspace
1. Use Separate Utensils: Have different utensils for each station to avoid contamination. For example, use one fork for dredging in flour, another for the egg, and a third for the breadcrumbs.
2. Batch Processing: Bread a few pickles at a time to maintain focus. This method prevents the breading from becoming soggy before they make it to the oven.
3. Clean as You Go: Keep your area clean by wiping down surfaces and disposing of waste as you work. A tidy workspace enhances efficiency and safety.
Breading the Pickles
Now, let’s focus on the actual breading process:
1. Coat Each Pickle: Take a dill pickle slice and dredge it in the flour, ensuring it’s fully coated. Shake off any excess flour before moving to the egg.
2. Egg Dip: Dip the floured pickle into the egg mixture, allowing any excess to drip off. This step is crucial for achieving a moist interior.
3. Breadcrumb Coating: Finally, place the pickle slice in the breadcrumb mixture, pressing down lightly to ensure an even coating. Repeat this process until all pickle slices are breaded.
Arranging on Baking Sheet
Proper arrangement on the baking sheet is vital for even cooking and crispiness:
1. Choose Your Baking Sheet: A rimmed baking sheet works best to catch any crumbs or spills.
2. Use Parchment Paper: Line the baking sheet with parchment paper for easier cleanup and to prevent sticking.
3. Spacing is Key: Arrange the breaded pickle chips in a single layer, ensuring there’s space between each slice. This allows hot air to circulate around the pickles, promoting even cooking and crispiness.
4. Spray with Cooking Spray: Lightly spray the breaded pickles with cooking spray or drizzle a little olive oil over them before baking. This addition helps achieve a golden-brown color and enhances the texture.
Baking Process
Now it’s time to bake your crunchy dill delights:
1. Preheat the Oven: Set your oven to 425°F (220°C) to ensure it’s hot enough for optimal crispiness.
2. Baking Time: Bake the pickle chips for about 15-20 minutes, flipping them halfway through. This flipping action ensures both sides get evenly browned and crispy.
3. Visual Cues for Doneness: Keep an eye on the pickle chips. They should be golden brown and crisp to the touch. If they start to darken too quickly, reduce the oven temperature slightly.
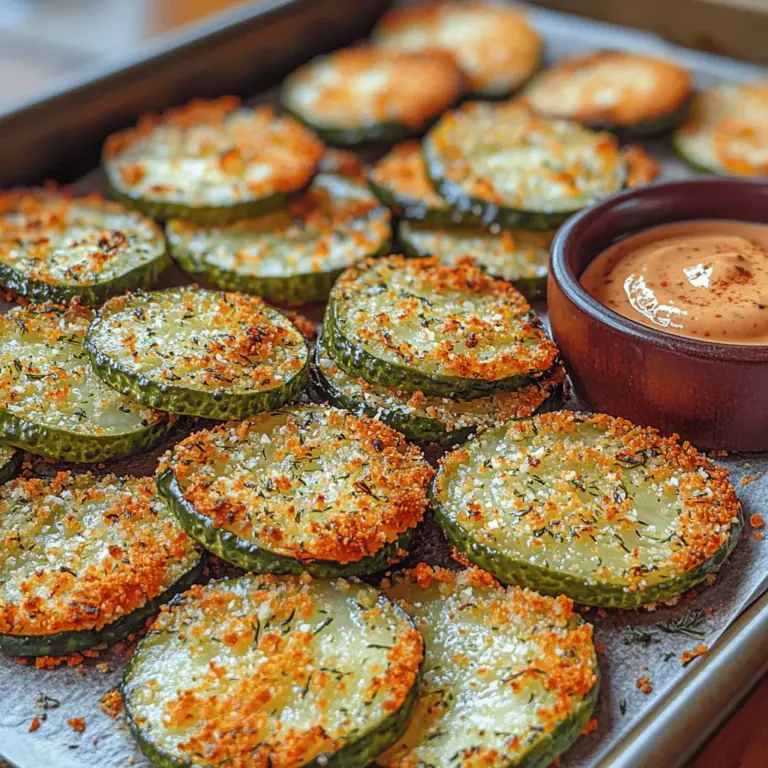
Serving Suggestions
Once your baked pickle chips are out of the oven, it’s time to enjoy them! Here are some delightful serving ideas:
1. Dipping Sauces: Pair your crispy pickle chips with a variety of dipping sauces. Classic options include:
– Ranch dressing for a creamy contrast.
– Spicy mayo for a kick of heat.
– Tangy mustard for a zesty flavor.
2. Gourmet Options: Consider unique or gourmet dipping sauces to elevate your snack experience, such as:
– Dill-infused yogurt dip.
– Sriracha aioli for a spicy twist.
– Honey mustard for a sweet and savory combination.
3. Creative Serving Ideas: Serve the pickle chips in a fun and inviting way:
– Arrange them on a platter for parties, paired with an assortment of dips.
– Create a pickle bar where guests can choose their favorite sauces.
– Use small mason jars filled with different dips for a rustic touch.
Health Benefits of Baked Pickle Chips
When it comes to snacking, baked pickle chips offer several advantages over their fried counterparts:
1. Lower in Calories and Fat: Baked snacks generally have fewer calories and less fat compared to fried options. By choosing to bake rather than fry, you can enjoy a guilt-free indulgence.
2. Nutritional Benefits of Dill Pickles: Dill pickles contribute probiotics to your diet, promoting gut health. They are also rich in antioxidants, which can help combat oxidative stress in the body.
3. Incorporating Baked Snacks into a Balanced Diet: Baked pickle chips can be part of a balanced diet when enjoyed in moderation. They provide a satisfying crunch without the heaviness of traditional fried snacks.
Conclusion
In summary, this crunchy dill delight recipe is not only easy to make but also a healthier alternative to traditional fried snacks. The unique combination of crispy textures and the tangy flavor of dill pickles creates a delightful snacking experience. With their numerous health benefits, baked pickle chips are a guilt-free indulgence that can satisfy your cravings.
We encourage you to try making your own batch of crunchy dill pickle chips at home. Experiment with different seasonings and dipping sauces to find your perfect flavor combination. Homemade snacks provide an opportunity to control the ingredients while indulging in your favorite flavors. Enjoy the versatility and enjoyment of creating delicious bites that everyone can appreciate!
