Choco-Coco Bliss Balls: A Healthy Snack Revolution
In recent years, the trend towards healthier eating has surged, with an increasing number of people seeking nutritious snack options that not only satisfy cravings but also support overall well-being. With our busy lifestyles, finding quick, healthy alternatives to traditional snacks has become essential. Enter Choco-Coco Bliss Balls—a delightful fusion of taste and nutrition that promises to curb your sweet tooth while packing a powerful punch of health benefits.
Choco-Coco Bliss Balls are not your average snack; they are a symphony of flavors and textures, combining the richness of chocolate with the tropical essence of coconut. These bite-sized treats are perfect for a midday energy boost, a post-workout snack, or a guilt-free indulgence after dinner. What sets them apart is their simplicity and the wholesome ingredients they contain, making them an ideal choice for health-conscious individuals and families alike.
The recipe for Choco-Coco Bliss Balls is incredibly straightforward, requiring minimal preparation and just a handful of nutritious components. With Medjool dates as the base, these bliss balls are naturally sweetened, eliminating the need for refined sugars. Packed with raw nuts, cocoa powder, shredded coconut, and a hint of vanilla extract, this recipe not only delights the taste buds but also nourishes the body.
Understanding the Ingredients
Before diving into the preparation of Choco-Coco Bliss Balls, it’s essential to understand the health benefits of each ingredient that contributes to this delectable treat.
Medjool Dates: Nature’s Sweetener
Medjool dates are the star of this recipe, providing natural sweetness along with a host of health benefits. These fruits are rich in dietary fiber, which aids digestion and helps maintain a healthy gut. Their high fiber content also contributes to a feeling of fullness, making them an excellent choice for those looking to manage their weight. Additionally, Medjool dates are packed with vitamins and minerals, including potassium, magnesium, and vitamin B6. This combination of nutrients not only satisfies your sweet cravings but also supports overall health.
Raw Nuts: A Nutritional Powerhouse
Incorporating raw nuts, such as almonds, cashews, or walnuts, into the bliss balls elevates their nutritional profile significantly. These nuts are a fantastic source of healthy fats, protein, and essential vitamins and minerals. Healthy fats play a crucial role in heart health and can help reduce inflammation in the body. The protein content in nuts also contributes to muscle repair and growth, making them a perfect snack for those with active lifestyles. Moreover, raw nuts provide a satisfying crunch and depth of flavor that complements the sweetness of the dates perfectly.
Cocoa Powder: The Mood Booster
Cocoa powder is another key ingredient in Choco-Coco Bliss Balls, adding the rich chocolate flavor that makes these snacks irresistible. Beyond its taste, cocoa powder is known for its high antioxidant content, which can help combat oxidative stress in the body. Additionally, it contains compounds that may boost mood and improve cognitive function. Including cocoa powder in your diet can be a delicious way to enhance your mental well-being while indulging in a sweet treat.
Vanilla Extract and Sea Salt: Flavor Enhancers
The addition of vanilla extract brings a warm and inviting flavor to the bliss balls, while a pinch of sea salt enhances the overall taste by balancing the sweetness. Vanilla has been shown to have calming effects, which can contribute to a more enjoyable snacking experience. Sea salt, when used in moderation, can help enhance the flavors of the other ingredients, creating a harmonious blend that tantalizes the palate.
Shredded Coconut: The Tropical Twist
Shredded coconut is not just for decoration; it plays a vital role in the texture and flavor of Choco-Coco Bliss Balls. Coconut is rich in healthy fats, particularly medium-chain triglycerides (MCTs), which have been linked to various health benefits, including improved metabolism and energy levels. Additionally, shredded coconut adds a delightful chewiness to the bliss balls, making each bite a pleasurable experience. The fiber content in coconut also contributes to digestive health, rounding out the nutritional benefits of this recipe.
Chia Seeds: An Optional Superfood Addition
While chia seeds are optional in this recipe, they offer an array of nutritional benefits that are hard to ignore. These tiny seeds are an excellent source of Omega-3 fatty acids, which are essential for heart health and brain function. They are also packed with fiber, providing additional health benefits and helping to keep you feeling full for longer. Including chia seeds in your bliss balls not only boosts their nutritional value but also adds a slight crunch and nutty flavor, enhancing the overall texture of the snack.
Step-by-Step Instructions for Choco-Coco Bliss Balls
Now that we’ve explored the health benefits of the ingredients, let’s dive into the step-by-step process of making Choco-Coco Bliss Balls. This simple recipe ensures that you can whip up a batch in no time, making it an ideal go-to snack for any occasion.
1. Preparing the Nuts
Start by selecting your choice of raw nuts—almonds, cashews, or walnuts work beautifully in this recipe. Measure out about one cup of nuts and place them in a food processor. Pulse the nuts until they are finely chopped but not turned into nut butter. Achieving the right texture is crucial, as you want the nuts to contribute to the overall crunchiness of the bliss balls without becoming overly smooth.
2. Blending the Dates and Ingredients
Next, take about one cup of Medjool dates, pitting them if necessary. Add the dates to the food processor with the chopped nuts. At this stage, you can also include a quarter cup of cocoa powder, a teaspoon of vanilla extract, and a pinch of sea salt. Process the mixture until it becomes sticky and well combined. If the mixture seems too dry, you can add a tablespoon of water or a bit more date to achieve the desired consistency.
3. Achieving the Perfect Sticky Consistency
The consistency of the mixture is key to shaping the bliss balls. You want it to be sticky enough to hold together but not overly wet. If it feels too crumbly, add a few more dates; if it’s too wet, a little more cocoa powder or nuts can help balance it out. It’s all about finding that sweet spot where the ingredients bind together perfectly.
4. Incorporating Shredded Coconut and Chia Seeds
Once you have the right consistency, it’s time to incorporate the shredded coconut and, if desired, chia seeds. Fold in half a cup of shredded coconut and a couple of tablespoons of chia seeds into the mixture. Ensure that these ingredients are evenly distributed throughout the mixture for optimal flavor and texture.
5. Shaping the Bliss Balls
With your mixture ready, it’s time to shape the bliss balls. Using your hands, take a small amount of the mixture and roll it into a ball, about the size of a tablespoon. To ensure uniform size and texture, you can use a cookie scoop or a tablespoon for measuring each portion. This will help create consistently sized bliss balls that are easy to share and enjoy.
These initial steps set the foundation for creating your Choco-Coco Bliss Balls. Stay tuned for the following sections, where we will explore additional tips, variations, and ways to enjoy these healthy treats that will leave you craving more.
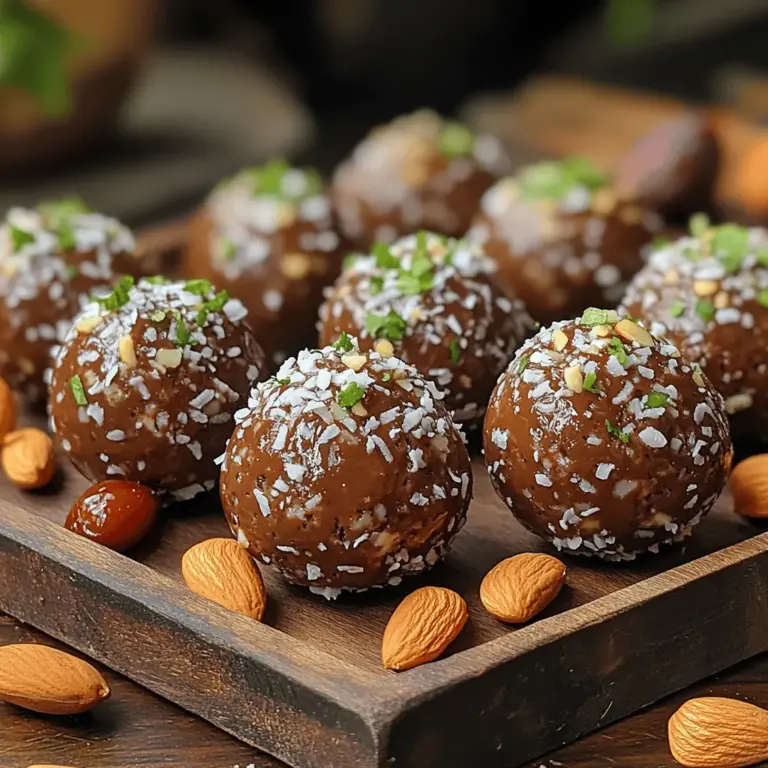
{{image_2}}
Coating the Bliss Balls in Coconut
After forming your bliss balls, the next step is to give them a delightful outer layer that enhances both flavor and appearance. Coating the bliss balls in shredded coconut not only adds a wonderful texture but also elevates their visual appeal. To do this effectively, place shredded coconut on a plate. Gently roll each bliss ball in the coconut until fully coated. This step not only improves the taste but also creates a beautiful contrast with the rich chocolate center.
Enhancing Appearance and Flavor
The addition of coconut brings a tropical flair to the Choco-Coco Bliss Balls. Consider using different types of coconut for varied textures and flavors. For instance, you can use finely shredded coconut for a smoother finish or larger flakes for a more rustic look. If you’re feeling adventurous, try toasting the shredded coconut lightly in a pan for a deeper, nuttier flavor. This simple step can significantly enhance the overall taste and make your bliss balls even more irresistible.
Chilling Process for Firmness and Flavor Development
Once your bliss balls are coated, it’s crucial to allow them to chill in the refrigerator. This chilling process serves two primary purposes: it helps the balls firm up and allows the flavors to meld beautifully. Place the coated bliss balls on a baking sheet lined with parchment paper and refrigerate for at least 30 minutes. During this time, the coconut oil in the mixture solidifies, ensuring that each bliss ball maintains its shape when served.
Importance of Refrigeration for Texture
Refrigeration not only helps with the firmness of the bliss balls but also enhances their texture. As the ingredients chill together, their flavors develop, resulting in a richer taste experience. Proper chilling also prevents the bliss balls from being too soft or sticky, making them easier to handle and enjoy. Additionally, if you find the bliss balls too soft to roll initially, consider chilling the mixture for about 15 minutes before forming the balls. This minor adjustment can make a significant difference in the handling process.
Serving Suggestions and Storage Tips
Choco-Coco Bliss Balls make for an excellent snack any time of the day. They are perfect for an afternoon energy boost, a pre-workout snack, or a healthy dessert option. Serve them in small bowls for gatherings, or pack them into snack bags for on-the-go convenience. You can also pair them with a cup of herbal tea or coffee for an enjoyable treat.
Best Practices to Maintain Freshness
To store your bliss balls, keep them in an airtight container in the refrigerator. They can last for up to a week, maintaining their freshness and flavor. For longer storage, consider freezing them. Place the bliss balls on a baking sheet to freeze individually, then transfer them to a freezer-safe container or bag. When stored this way, they can last for up to three months. Simply thaw them in the refrigerator or at room temperature before enjoying.
Nutritional Information and Benefits
Breakdown of Calories and Macronutrients per Bliss Ball
Each Choco-Coco Bliss Ball is a powerhouse of nutrition packed into a small bite. On average, one bliss ball contains approximately 100 calories, along with a balanced mix of macronutrients. They typically consist of around 6 grams of healthy fats, 8 grams of carbohydrates, and 2 grams of protein. This makes them an excellent option for those looking for a nutritious snack that keeps energy levels stable.
Discussion of the Health Benefits of Each Ingredient
The ingredients in Choco-Coco Bliss Balls are not only delicious but also provide numerous health benefits.
– Dates: These are a natural sweetener that provides fiber, vitamins, and minerals. They are also rich in antioxidants, which help combat oxidative stress in the body.
– Cocoa powder: Known for its high antioxidant content, cocoa powder can enhance mood and cognitive function while providing a rich chocolate flavor without added sugars.
– Coconut: This ingredient offers healthy fats and fiber, which can help support digestion and heart health.
– Nuts: Depending on the type of nuts used, you can benefit from a variety of nutrients, including protein, healthy fats, and essential vitamins and minerals.
How Choco-Coco Bliss Balls Fit into a Balanced Diet
Incorporating Choco-Coco Bliss Balls into your diet can contribute to overall health. They provide a balanced combination of carbohydrates and healthy fats, making them an ideal snack for those looking to maintain energy levels throughout the day. They are also free from refined sugars and unhealthy additives, making them a wholesome alternative to traditional snacks.
Comparison with Store-Bought Snacks
When comparing homemade Choco-Coco Bliss Balls to store-bought snacks, the advantages of making your own become clear. Store-bought options often contain added sugars, unhealthy fats, and preservatives. In contrast, these bliss balls are made from wholesome ingredients that you control, ensuring that you know exactly what you’re consuming. This not only promotes better health but also aligns with mindful eating practices.
Why Homemade Options Are Typically Healthier
Homemade snacks like Choco-Coco Bliss Balls allow for customization based on personal dietary preferences and restrictions. You can easily swap ingredients to accommodate allergies or specific dietary needs, making them a versatile snack choice. Moreover, preparing your snacks at home fosters a sense of awareness about your food choices, encouraging healthier eating habits overall.
Creative Variations on Choco-Coco Bliss Balls
Suggestions for Ingredient Substitutions
One of the best aspects of Choco-Coco Bliss Balls is their flexibility. You can experiment with various ingredients to create your perfect treat. If you are allergic to nuts, consider using seeds like sunflower or pumpkin seeds as a nut-free alternative. For a boost of flavor and nutrients, try incorporating nut or seed butters.
Alternative Nuts and Sweeteners for Dietary Preferences
If you prefer different nuts, almonds, cashews, or walnuts work excellently in this recipe. For those seeking lower-sugar options, experiment with alternative sweeteners like maple syrup, agave nectar, or even stevia for a sugar-free treat.
Flavor Variations
To add a twist to your bliss balls, consider flavor variations. You can mix in spices such as cinnamon, nutmeg, or even a hint of chili powder for a spicy kick. Adding a splash of vanilla extract can also enhance the overall flavor profile.
Adding Spices Like Cinnamon or Nutmeg for a Unique Twist
Spices not only add flavor but also pack additional health benefits. Cinnamon is known for its anti-inflammatory properties and can help regulate blood sugar levels, while nutmeg can improve digestion and has antioxidant properties.
Incorporating Dried Fruits or Seeds for Additional Texture
For added texture and flavor, try mixing in some chopped dried fruits like cranberries, apricots, or raisins. They provide a chewy contrast to the smoothness of the bliss balls and contribute natural sweetness. Additionally, sprinkling chia seeds or flaxseeds into the mixture can enhance nutritional value and create a delightful crunch.
Seasonal Variations
You can also create seasonal variations of Choco-Coco Bliss Balls. For instance, during the fall, consider incorporating pumpkin spice into the mixture for a festive treat. In the summer, add a hint of citrus zest, such as orange or lemon, for a refreshing twist.
Final Thoughts on Healthy Snacking
Healthy snacking is an essential aspect of maintaining energy and nutritional balance throughout the day. Mindful eating encourages us to be aware of our choices and to select snacks that nourish our bodies. Choco-Coco Bliss Balls are an excellent option for anyone looking to indulge their sweet tooth while still making healthy choices.
Encouragement to Experiment with the Recipe and Make it Personal
Don’t hesitate to experiment with the recipe! The beauty of making your own bliss balls lies in the ability to personalize them to suit your tastes and dietary needs. Whether you prefer a denser ball or a fluffier texture, adjusting the ingredients and proportions can help you find your perfect combination.
Reflection on the Joy of Preparing and Sharing Healthy Treats
Preparing and sharing healthy treats like Choco-Coco Bliss Balls can be a joyful experience. Not only do you get to enjoy the fruits of your labor, but you can also share them with friends and family, spreading the joy of healthy eating. These bliss balls are not just a snack; they are a way to connect with others and promote a healthier lifestyle.
Conclusion
Choco-Coco Bliss Balls are a simple yet nutritious snack option that everyone can enjoy. With their rich flavor, delightful texture, and numerous health benefits, they represent an excellent choice for satisfying your sweet cravings without compromising your health.
Emphasizing the importance of homemade snacks, these bliss balls stand out as a healthier alternative to many store-bought options. By incorporating them into your daily snacking habits, you can enjoy a guilt-free treat that nourishes both body and mind. So gather your ingredients, get creative, and indulge in the wholesome goodness of Choco-Coco Bliss Balls today!