Zesty Mini Lemon Meringue Pies: A Delightful Citrus Treat
Lemon meringue pie has long been a beloved dessert, captivating taste buds with its harmonious blend of tangy lemon filling, fluffy meringue, and a buttery crust. This dessert has earned its place in the hearts of many, often gracing the tables of family gatherings and festive occasions. However, as culinary trends evolve, mini versions of this classic pie have emerged as a delightful alternative. Zesty mini lemon meringue pies offer the same cherished flavors but in a more convenient and playful format, making them perfect for both gatherings and individual indulgence.
The appeal of these mini treats lies in their zesty brightness and airy texture, which provide a refreshing and light dessert option. Each bite is a burst of citrus that awakens the palate, making them an ideal choice for warm-weather events or any occasion that calls for a touch of sweetness without overwhelming richness. Whether served at a summer picnic, a holiday gathering, or simply as a personal treat, these mini pies deliver the perfect balance of tart and sweet, leaving a lasting impression on anyone fortunate enough to enjoy them.
The Joy of Mini Desserts
In recent years, the trend toward mini desserts has gained significant popularity in culinary circles. Miniature versions of classic desserts allow for creativity and elegance in presentation, appealing to those who appreciate both aesthetics and flavor. The appeal of these petite delights is multifaceted; they offer portion control, allowing dessert lovers to indulge without overindulging. Additionally, mini desserts can be beautifully arranged on platters, providing an eye-catching centerpiece that enhances any event.
Many people have fond memories associated with mini desserts. For instance, attending a wedding where a dessert bar featured an array of bite-sized treats, including mini tarts and cheesecakes, made for a memorable evening. These small delights encouraged guests to sample a variety of flavors without feeling guilty about finishing an entire slice of cake. The joy of sharing and enjoying mini desserts fosters a communal spirit, making gatherings all the more special.
Ingredients Breakdown
To create the perfect zesty mini lemon meringue pies, a careful selection of fresh and high-quality ingredients is essential. Here’s a detailed look at each component of the recipe:
– Lemon Filling: The star of the show, the lemon filling, should be made with fresh lemons to ensure the best flavor. Freshly squeezed lemon juice provides a vibrant tang, while the zest enhances the aromatic quality of the filling. Using high-quality ingredients will elevate the overall taste of the pie.
– Mini Pie Crusts: A flaky and buttery crust is crucial in achieving the ideal texture and taste. The crust serves as the foundation for the pies, and a well-prepared crust will provide a delightful contrast to the creamy lemon filling. Choosing the right ratio of flour to fat is key to achieving that perfect flaky texture.
– Meringue Topping: The crowning glory of any lemon meringue pie is its meringue topping. Achieving the perfect meringue creates a visually appealing and delicious finish. The lightness of the meringue complements the tartness of the lemon filling, while also providing a beautiful contrast in texture.
Preparing the Perfect Pie Crust
Making the mini pie crusts is a crucial step toward creating your zesty lemon meringue pies. Follow these step-by-step guidelines to ensure your crusts turn out perfectly:
1. Gather Your Ingredients: For a basic mini pie crust, you will need all-purpose flour, unsalted butter, sugar, salt, and ice water. The key to a flaky crust lies in the cold temperature of the butter, which helps create layers as it bakes.
2. Mixing the Dough: Begin by combining the flour, sugar, and salt in a mixing bowl. Cut in the cold butter using a pastry cutter or your fingertips until the mixture resembles coarse crumbs. The goal is to achieve a texture where the butter is incorporated but still in small pieces, which will lead to a flaky crust.
3. Adding Water: Gradually add ice water, one tablespoon at a time, mixing gently until the dough holds together. Be careful not to overmix, as this can lead to a tough crust. The dough should be slightly sticky but manageable.
4. Chilling the Dough: Once your dough is mixed, shape it into a ball, flatten it into a disk, and wrap it in plastic wrap. Refrigerate for at least 30 minutes. Chilling the dough is essential for two reasons: it relaxes the gluten, preventing toughness, and keeps the butter cold, which is vital for achieving a flaky texture during baking.
Baking the Crusts to Perfection
After chilling, it’s time to shape and bake your mini pie crusts. Follow these detailed instructions for a successful baking process:
1. Preheat the Oven: Start by preheating your oven to 375°F (190°C). This ensures that the crusts begin baking immediately, which helps to set their shape.
2. Rolling Out the Dough: On a lightly floured surface, roll out the chilled dough to about 1/8-inch thickness. Use a round cutter or a glass to cut out circles that will fit into your mini muffin or tart pans. Make sure to leave some excess dough for the edges.
3. Fitting the Crusts: Carefully transfer the dough circles into the prepared mini muffin or tart pans, pressing gently to fit the dough into the shape of the pan. Trim any excess dough hanging over the edges for a neat finish.
4. Using Pie Weights: To prevent the crusts from puffing up during baking, place pie weights or dried beans on top of the crusts. This technique helps maintain the shape and ensures an even bake.
5. Baking Time: Bake the crusts in the preheated oven for about 15-20 minutes, or until lightly golden. Keep an eye on them to avoid over-baking. The visual cue to look for is a golden-brown color on the edges.
6. Cooling the Crusts: Once baked, remove the crusts from the oven and allow them to cool in the pans for a few minutes before transferring them to a wire rack. This step is crucial, as you’ll want the crusts to cool completely before adding the lemon filling to prevent sogginess.
With the pie crusts perfectly baked and cooled, you are now ready to move on to crafting the zesty lemon filling, which will complete your delightful mini lemon meringue pies. Stay tuned for the next section, where we will dive into the exciting process of creating that tangy lemon filling that will make these pies unforgettable.
{{image_2}}
Cooking the Lemon Filling
Creating the perfect lemon filling for your mini lemon meringue pies is an essential step in achieving that classic, zesty flavor. Begin by whisking together your sugar, cornstarch, and salt in a medium saucepan. This combination will thicken your filling and give it that signature texture.
Next, in a separate bowl, crack the egg yolks and whisk them until they’re homogenous. This is the tempering process that prevents your egg yolks from curdling. Gradually add a small amount of the warm sugar mixture to the yolks while whisking continuously. This step is crucial; it warms the yolks gently, allowing them to blend smoothly when added back to the saucepan.
Once tempered, pour the yolk mixture back into the saucepan with the remaining sugar mixture. Stir over medium heat until the mixture thickens and begins to bubble, usually around 7-10 minutes. It should coat the back of a spoon. To achieve the right consistency, it’s important to keep stirring to prevent sticking and ensure a uniform texture.
For the ultimate flavor enhancement, use fresh lemon juice and zest. The zest not only infuses your filling with vibrant citrus flavor but also adds a delightful aroma. Aim for about three medium lemons for both the juice and zest needed for this recipe. Freshly squeezed juice is vital, as it provides a brightness that bottled lemon juice simply cannot match. Once your filling has thickened, remove it from the heat and add the lemon juice and zest, stirring until fully incorporated.
Mastering the Meringue Topping
The crowning glory of your mini lemon meringue pies is undoubtedly the meringue topping. To prepare it, start with clean, dry mixing bowls and beaters. Any grease or moisture can interfere with the stability of the meringue. Begin by separating your egg whites from yolks very carefully; even a speck of yolk can prevent your whites from whipping properly.
In a large bowl, beat the egg whites on medium speed until they become frothy. At this stage, add a pinch of cream of tartar. This ingredient helps stabilize the egg whites, allowing them to achieve their full volume. Continue to beat until soft peaks form. This means that when you lift the beaters out of the mixture, the peaks should gently fold over.
Gradually add sugar—about one tablespoon at a time—while continuing to beat the egg whites. This slow addition is crucial; it allows the sugar to dissolve fully, contributing to a smooth, glossy finish. Once all the sugar is integrated, increase the speed to high and continue beating until stiff peaks form. Stiff peaks mean that the egg whites hold their shape firmly when the beaters are lifted out.
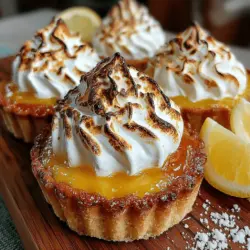
The visual impact of your meringue is just as important as the taste. For that perfectly browned meringue, consider using a kitchen torch or broiler at the end of baking. A golden-brown meringue not only looks stunning but also adds a slight caramelized flavor that contrasts beautifully with the tart lemon filling.
Assembling Your Mini Lemon Meringue Pies
Now that you have both your lemon filling and meringue ready, it’s time to assemble your pies. Start by filling each pre-baked mini pie crust with the lemon filling. Use a spoon to carefully fill each crust up to the edge, ensuring an even distribution for a lovely presentation.
Once each crust is filled, it’s time to seal the pies with meringue. This step is crucial for both aesthetics and preserving the lemon filling. Use a spatula to spread the meringue over the filling, ensuring it touches the edges of the crust. This seals the filling in and prevents it from weeping.
For an elegant finish, consider piping the meringue onto the pies. Fit a piping bag with a star tip and fill it with meringue. Pipe decorative swirls or peaks over each pie, giving them a professional look. The texture of the meringue will create a beautiful contrast with the smooth lemon filling, making your pies visually appealing.
Baking and Cooling the Assembled Pies
Once your pies are assembled, place them into a preheated oven at 350°F (175°C) for about 10-12 minutes. Keep a close eye on them, as the goal is to achieve a lovely golden-brown color on the meringue without burning it. The meringue will puff slightly during baking, creating an attractive dome shape.
After baking, remove the pies from the oven and allow them to cool at room temperature for about 30 minutes. This cooling period is essential, as it helps the meringue set and maintain its shape. To ensure that the meringue doesn’t weep, serve the pies soon after they have cooled, or refrigerate them if you plan to serve them later.
Presentation Ideas for Serving
Presentation is key when it comes to impressing your guests with your mini lemon meringue pies. For a simple yet elegant touch, consider garnishing each pie with a twist of lemon peel or a sprinkle of lemon zest. This adds a pop of color and enhances the citrus aroma.
Another creative idea is to dust the top of the meringue lightly with powdered sugar or edible glitter for a touch of sparkle. This can elevate the visual appeal significantly, making your pies look festive and inviting.
When serving, consider whether you prefer chilled or room temperature pies. Chilled pies provide a refreshing contrast to the sweet meringue and tangy filling, making them perfect for warm weather gatherings. Room temperature pies, however, allow the flavors to meld beautifully, presenting a more cohesive taste experience.
Conclusion
Making zesty mini lemon meringue pies is not only a rewarding culinary experience but also a delightful treat to share with family and friends. The balance of sweet meringue, tangy lemon filling, and buttery crust creates a symphony of flavors that is hard to resist. Whether you are preparing these pies for a special occasion, a potluck, or simply to satisfy a sweet craving, this recipe is sure to impress.
So why not give this recipe a try? The joy of baking and sharing homemade desserts is unparalleled, and these mini pies are the perfect way to showcase your culinary skills. With the bright, zesty flavor of lemon and the light, airy texture of meringue, your loved ones will be asking for seconds — and maybe even thirds. Happy baking!