
Oreo Cheesecake Dream Bars: A Delicious Twist on Classic Cheesecake
Cheesecake has long been a beloved dessert, cherished for its rich and creamy texture that melts in your mouth. Whether enjoyed plain, topped with fruit, or infused with chocolate, its versatility has made it a staple in dessert menus around the world. Among the myriad of cheesecake variations, one stands out for its unique flavor and texture: the Oreo Cheesecake Dream Bars. This delightful twist on the traditional cheesecake combines the iconic taste of Oreo cookies with the smoothness of cream cheese, resulting in a dessert that is both indulgent and satisfying.
Oreo Cheesecake Dream Bars are not just another cheesecake; they are a decadent fusion that appeals to both Oreo aficionados and cheesecake enthusiasts alike. The layers of creamy cheesecake filling enveloped in a crunchy Oreo crust create a delightful contrast that is hard to resist. Beyond their delicious flavor, one of the most appealing aspects of these bars is their ease of preparation. With straightforward steps and minimal baking time, even novice bakers can achieve stunning results that are sure to impress family and friends.
The Allure of Oreo Cheesecake Dream Bars
What makes Oreo Cheesecake Dream Bars so irresistible is the harmonious blend of flavors and textures. The creamy cheesecake filling is enriched with crushed Oreo pieces, which infuse the mixture with a delightful chocolatey essence. Meanwhile, the crust, made entirely from crushed Oreos, provides a satisfying crunch that perfectly complements the smooth filling. This combination of creamy and crunchy is not only pleasing to the palate but also visually appealing, making these bars a standout dessert for any occasion.
The appeal of these bars extends beyond their taste; they also cater to a wide audience. Whether you are an Oreo lover or a cheesecake connoisseur, this dessert has something special to offer. The layers of flavor and texture create a multi-dimensional experience that keeps you coming back for more. Additionally, the visual allure of these bars, with their dark crust and creamy filling, makes them a fantastic choice for gatherings, celebrations, or even a cozy night in.
Ingredients Breakdown
To create the perfect Oreo Cheesecake Dream Bars, it is essential to use high-quality ingredients that enhance the overall flavor of the dessert. Below is a detailed breakdown of each ingredient and its role in the recipe:
1. Oreo Cookies: The star ingredient of this recipe, Oreos serve as both the crust and an integral part of the cheesecake filling. Their rich chocolate flavor and unique cream filling add depth and character to the bars.
2. Cream Cheese: The base of the cheesecake filling, cream cheese provides the creamy texture that cheesecake lovers crave. It is crucial to use softened cream cheese to ensure a smooth and lump-free mixture.
3. Granulated Sugar: Sugar balances the richness of the cream cheese and adds sweetness to the filling. The amount can be adjusted to taste, depending on your preference for sweetness.
4. Eggs: Eggs are essential for binding the filling and providing structure to the cheesecake. They help achieve a silky texture while allowing the cheesecake to set properly.
5. Vanilla Extract: A splash of vanilla extract enhances the overall flavor of the cheesecake, adding a subtle warmth that complements the chocolatey notes of the Oreos.
6. Butter: Used to bind the Oreo crust, melted butter adds richness and helps the crust hold its shape when baked.
For those with dietary restrictions, there are several variations and substitutions that can be made. Gluten-free Oreos are available for those avoiding gluten, and vegan cream cheese can be used to create a dairy-free version of these bars. Additionally, alternative sweeteners like coconut sugar or agave syrup can be employed to cater to different dietary needs.
Step-by-Step Instructions for Perfect Cheesecake Bars
Preparing the Oreo Crust
The first step in creating Oreo Cheesecake Dream Bars is preparing the crust, which sets the foundation for the entire dessert. To achieve the right texture for the crust, it’s important to crush the Oreo cookies into fine crumbs. A food processor is an excellent tool for this task, as it ensures even crushing and saves time. Simply place the Oreos in the processor and pulse until they resemble fine sand.
Once the cookies are crushed, transfer them to a mixing bowl and combine them with melted butter. The butter acts as a binding agent, helping the crumbs stick together when pressed into the baking dish. Mix thoroughly until the crumbs are well-coated with butter, and the mixture resembles wet sand.
Assembling the Base
Next, it’s time to assemble the crust in the baking dish. Line an 8×8-inch or 9×9-inch square baking dish with parchment paper for easy removal later. Pour the Oreo crumb mixture into the dish and use the back of a measuring cup or your hands to press it down evenly. It’s important to create a firm, compact base to support the cheesecake filling that will be added later.
Once the crust is evenly pressed down, place the baking dish in the refrigerator for at least 10-15 minutes to chill. This chilling process allows the butter to solidify, resulting in a firmer crust that holds its shape during baking.
Creating the Cheesecake Filling
While the crust is chilling, it’s time to prepare the creamy cheesecake filling. Start by ensuring that your cream cheese is softened to room temperature; this step is crucial for achieving a smooth and creamy texture. Using an electric mixer, beat the softened cream cheese until it is light and fluffy, which usually takes about 2-3 minutes.
Next, gradually add the granulated sugar and continue to mix until well combined. This process helps to incorporate air into the mixture, creating a light and creamy filling. Once the sugar is fully integrated, add the eggs one at a time, mixing well after each addition. This method ensures that the eggs are evenly distributed throughout the filling.
Finally, add the vanilla extract and any additional crushed Oreos you wish to incorporate into the filling. Gently fold in the crushed Oreos with a spatula to maintain the airy texture of the mixture.
As you prepare to bake your Oreo Cheesecake Dream Bars, the combination of the rich, creamy filling and the crunchy crust sets the stage for a truly indulgent dessert that is sure to impress. The next steps will involve pouring the filling over the chilled crust and baking to perfection, creating a delightful treat that will leave everyone craving more.
Stay tuned for the continuation where we will guide you through the baking process and the finishing touches that will elevate these bars to dessert stardom!
{{image_2}}
Enhancing Flavor Profiles
Creating a delicious Oreo cheesecake dream bar is not just about the basic ingredients; it’s also about enhancing the flavors to create a dessert that tantalizes the taste buds. Two key elements in elevating the flavor profile are vanilla extract and salt.
The Role of Vanilla Extract and Salt
Vanilla extract is often regarded as a secret weapon in baking. It adds depth and complexity to the overall flavor, making the cheesecake taste more rounded and inviting. A splash of high-quality vanilla extract in your cheesecake filling can transform the taste from ordinary to extraordinary.
Salt, on the other hand, acts as a flavor enhancer. It helps to balance the sweetness of the cheesecake and cuts through the richness, allowing the natural flavors of the cream cheese and Oreos to shine. A pinch of salt in your filling can make all the difference, so don’t skip this vital step.
Suggestions for Other Flavor Enhancers
For those looking to add an extra layer of flavor, consider incorporating lemon zest into the filling. The bright, citrus notes from the lemon will provide a refreshing contrast to the richness of the cheesecake, creating a well-rounded dessert. Just a teaspoon of freshly grated lemon zest can brighten the entire dish, making each bite a delightful surprise.
Incorporating Whipped Cream for Lightness
The texture of your Oreo cheesecake dream bars is just as important as the flavor. To achieve that delightful lightness, whipped cream plays a crucial role.
Importance of Gentle Folding
When adding whipped cream to your cheesecake filling, it’s essential to fold it in gently. This technique preserves the airy texture of the whipped cream, which is vital for keeping the cheesecake light and fluffy. Avoid vigorous mixing, which can deflate the whipped cream and result in a denser filling. Instead, use a spatula to carefully incorporate the whipped cream until just combined.
Tips for Achieving Perfect Whipped Cream
To achieve perfect whipped cream with soft peaks, start with cold heavy cream and a chilled mixing bowl. This will help the cream whip up faster and hold its shape better. Begin mixing on a low speed to avoid splattering, gradually increasing to medium-high speed until you see soft peaks forming. Be cautious not to overwhip; stopping just before stiff peaks will give you that ideal creamy texture.
Adding Extra Oreo Crunch
For the ultimate Oreo experience, don’t hesitate to incorporate more Oreos into your cheesecake filling.
Suggestions for Different Ways to Incorporate Oreos
You can crush additional Oreos to stir into the filling, providing a delightful crunch that complements the creamy texture. Alternatively, consider using chopped Oreos as a layer within the filling, creating a marbled effect that enhances both flavor and presentation.
Balancing Flavors and Textures
Achieving a balance between the creamy and crunchy elements is essential. By adding different sizes of cookie pieces—some finely crushed and others left in larger chunks—you create a varied texture that keeps each bite interesting. This variation will draw your guests in and make the bars feel even more indulgent.
Final Assembly and Chilling Process
The final assembly of your Oreo cheesecake dream bars is where all your hard work comes together.
Importance of Smoothing the Filling
Once your filling is ready, pour it over the prepared crust and use a spatula to smooth it out evenly. This step is crucial for ensuring that your bars have an even surface, which not only looks appealing but also ensures consistent slices when you cut them.
Guidelines for Covering and Refrigerating
After smoothing the filling, cover the pan with plastic wrap and refrigerate for at least 4 hours, or preferably overnight. This chilling time allows the cheesecake to set properly, ensuring that it holds its shape when cut. Patience is key here; the longer you let it chill, the better the texture will be.
Serving Suggestions for Oreo Cheesecake Dream Bars
When it comes to serving your Oreo cheesecake dream bars, presentation is everything.
Presentation Ideas
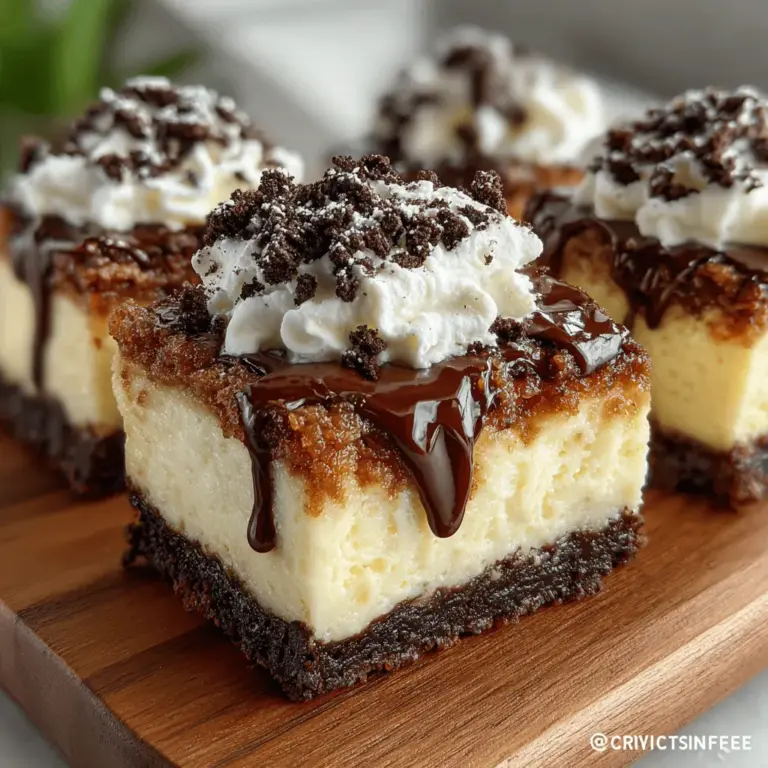
Consider cutting the bars into squares and placing them on a decorative platter. For an elegant touch, you can dust them with cocoa powder or powdered sugar just before serving. Adding fresh mint leaves can also enhance the presentation and provide a pop of color.
Exploring Optional Toppings
To take your Oreo cheesecake dream bars to the next level, experiment with various toppings. Crushed Oreos sprinkled on top can add extra crunch and visual appeal. A drizzle of chocolate sauce or caramel can provide a sweet contrast, while a dollop of whipped cream adds a creamy finish.
Pairing Ideas
For the perfect beverage pairing, consider serving these bars with a glass of cold milk or a rich cup of coffee. The combination of creamy cheesecake and the rich flavor of coffee or the sweetness of milk creates a delightful balance that complements the dessert beautifully.
Storing and Enjoying Your Cheesecake Bars
To ensure that your Oreo cheesecake dream bars maintain their deliciousness, proper storage is essential.
Best Practices for Storing Leftovers
Store any leftovers in an airtight container in the refrigerator. This will help retain their freshness and prevent any odors from the fridge from affecting their flavor. The bars are best enjoyed within 5 days, but they can last for up to a week if stored correctly.
Ideal Time Frame for Consumption
The ideal time to enjoy your cheesecake bars is within the first 3 days of making them. This ensures that you experience the creamy texture and fresh flavors at their peak. After that, while they will still be good, you may notice a slight change in texture, especially if they have been stored for longer periods.
Suggestions for Repurposing Bars
If you find yourself with leftover bars, consider repurposing them into dessert parfaits. Layer crumbled cheesecake bars with whipped cream and fresh berries in a glass for a stunning and delicious dessert that showcases the flavors of your original creation.
Conclusion
Making Oreo cheesecake dream bars is not only a fun baking experience but also results in a delectable dessert that everyone will love. From the rich layers of cream cheese and crushed Oreos to the delightful crunch and smoothness, every bite is a testament to the joy of baking.
Share this recipe with friends and family at your next gathering, and watch as they indulge in the deliciousness of homemade cheesecake bars. Baking is more than just a task; it’s an opportunity to create lasting memories and enjoy the delightful process of crafting something delicious from scratch. Whether for a special occasion or just because, these Oreo cheesecake dream bars are sure to bring joy to your table.
